Tuesday 29 October 2013

The Security database on the server does not have a computer account for this workstation trust relationship

If you receive the error: “The Security database on the server does not have a computer account for this workstation trust relationship” when you are tying to login to a domain account .This article will help fix this error when trying to logon to a domain account of a computer in a network.


To do this you will need:

· Access to the Domain Controller (DC)

· Domain administrators logon details

· The Workstations Local admin account login details

1. Login to the Domain controller and check to see if the Computer, which is having the issues, is available in Active Directory (AD).

a. Goto Start → Administrative tools → Active directory Users and Computers

b. Navigate to the List of computers that are connected to the domain.

2. If the computer isn’t available in this list you will just need to, on the computer, remove the computer from the current domain that it is on and then add it to the domain that it needs to be located on (see steps below). However if the computer is in the List you will need to:

a. Remove the computer from the current domain (on the local computer)

b. Delete the computer from AD (on the DC)

i. Right Click on the computer

ii. Click on Delete

For Windows Vista/7 & 8
1. Click the Start Menu and then right click Computer and go to Properties.

2. Click Change settings
3. Click Change


4. On the new window that should have popped up click the radio button next to Domain or Workgroup (depending if you are adding or removing the computer to the domain or a workgroup) (domain.local)or Workgroup name then click OK

5. You will be asked to provide the credentials of an account that has the rights to add the computer to the domain. Enter the username and password for the Administrator account.

6. After a brief pause you will be prompted with a welcome message. Click OK/Yes through these and the Computer should restart. If not tell the computer to restart.

7. Once booted again you can log in as the new user and set up an email account or anything else required by the user.

** If you ever need to remove a computer from the domain you can follow this procedure and select the WORKGROUP radio button instead of Domain in step 4. Bear in mind you will need to know the username and password of a local computer account in order to access the computer once it has been removed from the domain. **

Saturday 26 October 2013

How to Upgrade to Windows 8.1 From Windows 8

Make sure your PC has all recent Windows updates.
1a. Click settings on the Charms menu.

1b. Click Change PC settings.
1c. Select Windows Update

1d. Click the Check for updates now button to see if there are any new files. 

1e. Force any updates to install immediately by clicking on the “We’ll install . . . automatically” link then Intall.


2. Open the Windows Store app.

3. Click the Update to Windows 8.1 button. If you don’t see this button on the screen, check for updates again, close and reopen the Windows Store or reboot your machine.

4. Click the Download button to confirm

You may have to wait 30 minutes or more for the install to download, but you can keep using your computer during this time.

5. Click Restart Now when prompted

Your computer will then take several minutes installing Windows 8.1, complete with at least one reboot. You can walk away from your computer and do something else for 5 minutes or more because your input won’t be required for a while.

6.Click “I Accept” when presented with the License terms.

7. Click Use Express Settings at the bottom of the screen. You can also choose custom settings, but we find the Express settings work well for most users

8. Sign in to Windows as you normally would.

9. Allow Windows to send a security code to your phone if it prompts you. You can skip this step, but may not be able to sync your account across PCs without performing it later.

10. Enter the code you received on your phone at the prompt.

11. Click Next on the Skydrive screen.

You will then have to wait a few minutes while Windows finishes the install process. You’ll see some messages on the screen that say it is setting up and installing apps. 

Tuesday 15 October 2013

Install certificate to iPhone ( Active Directory based Authentication)

Active Directory

Create a new computer entry under the Mobile Devices OU ( which is the one i am using for mobile hardware devices)


Enable Advanced Features under the View menu, then open the newly created computer object. Go to Attribute Editor and add the following attributes:
  1. dNSHostName: devel1-ipad.domain.com.au
  2. operatingSystem: iOS (descriptive only - doesn't affect EAP-TLS)
  3. servicePrincipalName: HOST/devel1-ipad.domain.com.au (this is the name the device sends during the EAP-TLS negotiation, but with HOST in lowercase)

Certificate

Via the Certificate MMC snap-in (personal certificates), request a mobile device certificate. You need to have permission to enroll this certificate template.
  1. Subject name: (Common name) devel1-ipad.domain.com.au
  2. Alternative name: (DNS) devel1-ipad.domain.com.au
  3. Friendly name: Development Team iPad 1 (match the description in the Active Directory computer object you created)
The certificate should successfully create and return signed by the Issuing CA.
Export the certificate (no private key) as DER encoded binary X.509 (.CER) by right-clicking on the certificate in the snap-in.
As an administrator (i.e. a user with Active Directory object modification rights), publish the exported certificate (file) to Active Directory:
> certutil -v -f -dspublish "devel1-ipad.cer" Machine
-------------------------------------------------------------------------------
Result
CN=devel1-ipad,OU=Mobile Devices,OU=Staff,OU=Hardware,DC=Domain,DC=com,DC=au?userCertificate
Certificate added to DS store.
CertUtil: -dsPublish command completed successfully.


Client-Side Configuration

iPhone Configuration Utility (both iOS and OS X)

Using the iPhone Configuration Utility, create a new (or duplicated) configuration profile.
Go to DC and open the iphone configuration utility software

In the Credentials tab:
  • Import the company's Root certificate and the device certificate.
  • Enter the device certificate's password (to match the one you used after selecting it).
In the Wi-Fi tab:
  • Service Set Identifier: Network S
  • Hidden Network: not ticked
  • Security Type: WPA / WPA2 Enterprise
  • Protocols: TLS (ticked), all others (unticked)
  • Authentication / Username: host/hostname.domain.com.au (must match the Active Directory servicePrincipalName) N.B. "host" MUST be in lowercase, otherwise the AD service principal lookup will fail.
  • Authentication / Identity Certificate: select the device certificate.
  • Export the file to desktop as none security. 
  • copy the .mobileconfig file to desktop machine whether the Apple device connected. 
  • Open the Iphone configuration utility 
  • file --> add to library 
  • click on the device name on the left hand site.
  • select the configuration profile.
  • click install.
  • then it ll pop up in the device and finish the installation on the device.
Push to the device by attaching via USB, going to the device's configuration profiles tab and clicking on Install for the relevant profile.

Friday 11 October 2013

Configure FTP server in Linux

How to install FTP

The daemon is included in most versions of Linux. If you are using a Debian based distribution like Mint or Ubuntu, open a terminal window and type: sudo apt-get install vsftpd

If you are using a Red Hat based disto, open a terminal window and type: sudo yum install vsftp

How to configure FTP
To configure vsftp, open the vsftpd.conf file in the /etc directory. For instance, if you were using gedit as your text editor, you would type: sudo gedit /etc/vsftpd.conf

First, for a secure setup, you’ll want to disable anonymous access to your ftp server. Change this line: anonymous_enable=YES to anonymous_enable=NO

With anonymous access disabled, you’ll want to allow local users to log in, by uncommenting the following line: #local_enable=YES to local_enable=YES (simply remove the # sign).

Allow write access by uncommenting this line: #write_enable=YES to write_enable=YES

Save and close the file.

Setup an FTP user account:

sudo mkdir -p /home/ftp/ftpuser
sudo useradd ftpuser -d /home/ftp/ftpuser -s /bin/false
sudo passwd ftpuser

Restart your ftp server:
Debian: sudo etc/init.d/vsftpd restart
Red Hat: sudo service vsftpd restart

Test:

netstat -a | grep ftp

Wednesday 9 October 2013

Adding a Map Drive through GPO

Open the Group Policy Management Console by searching for it from the Start Menu

You’ll want to drill down into your domain until you reach the Machines object, where you can right-click and choose to Create a GPO.

We have to give our new policy a name, we will name ours Mapped Drives (General).

Now we can right click on the policy and choose edit.
The policy that controls mapped drives is located at

User Configuration\Preferences\Drive Maps

We need to select the policy and right click in the white space and select new mapped drive.
Change the action to create, and type a location for your shared folder.
Now set the label, this is the name that will appear on the drive in my computer. You will also need to choose a drive letter, it is a best practice to choose a static letter across the board, the last thing you need to do is change the radio button at the bottom to Show this drive.
Now when the users logon the drives will be effortlessly mapped.


Tuesday 8 October 2013

How to add a Start Menu to Windows 8 Desktop

The Start menu from the desktop mode in Windows 8 is one of the most controversial talking points of the new windows 8 operating system. I’ve been using Windows 8 for the past few months on a non-touch laptop and have found there aren’t too many things I need to do in the desktop mode that can’t be achieved by pinning programs to the Task bar, or using Win + x shortcut 

The program I’ve been trying is Classic Shell. Click the link to download it. The version tested is 3.6.2. Following the wizard to install it. Once installed have a read of the readme file. You’ll now have a Classic Start menu


One thing to note, the Windows Key now opens the Classic Start menu, so if you want to get back to the Metro Start menu, hold shift and click the Classic Start menu button. Classic Shell also has the ability to boot the computer straight to the Desktop mode. Take a look at the Classic Shell Settings as these are both configurable settings along with many others.
Hope this will give you a real feel to use windows 8 and windows 7 desktop. Now take a big breath and work on your windows 7 , oh no Grrrr. Windows 8 system......

How to copy incoming or outgoing emails to another mailbox in Exchange 2010

Occasionally you may have a requirement to copy incoming or outgoing emails for specific users to another mailbox for monitoring or compliance purposes.
To be able to do this you can use an Exchange Transport Rule.
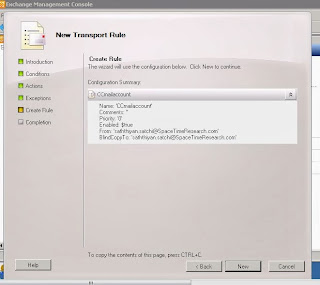
First open the Exchange Management Console, expand Organization Configuration, and select Hub Transport.
Right click the blank space in the main window and select New Transport Rule.
Select the conditions you want for the rule. Select from people as a condition, and then click the underlined value people to select from which people you want the rule to apply to. Click Add, and then add the email accounts you want to copy emails from. In our example we want to copy emails from the accounts mailbox. Click OK.


Click Next.
Now select the Action for the rule, in our scenario we are going to chooseBlind carbon copy (Bcc) the message to addresses, once selected, click the underlined addresses value. Click Add, select the user to Bcc the emails to, in our example we are going to Bcc the Administrator email account, clickOK, click Next.


If you want to add an exception to the rule you can do so next, in our example we want all emails to be copied so we won’t select an exception. Click Next.

Then on the Configuration Summary page click New to create the rule.

Done.....

Http vs Https