Dynamic Host Configuration Protocol (DHCP) automatically provides TCP/IP configuration including IP address, subnet mask, DG, DNS server and other parameters. This lab provides the required knowledge to install and manage the DHCP Server
Install DHCP role
We can install DHCP server role through server manager then add roles or from the PowerShell, follow
All the instructions are in the figures below.
-First option from PowerShell
- Second from Server Manager
Go to server manager and add the role DHCP and
continue the process as usual. This is just installing the service. Once the
service is installed you need to configure the DHCP service.
 |
Now the service has been installed successfully. We need to configure the DHCP service now.
DHCP
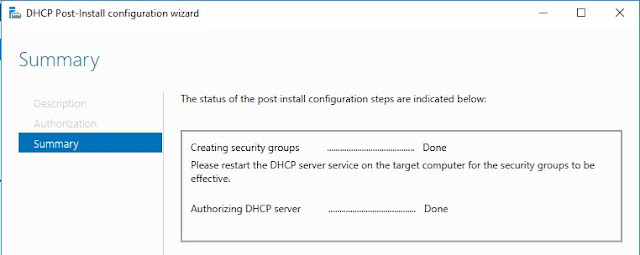
Post Installation Configuration
DHCP must be authorized in
Active Directory to lease IP addresses to DHCP clients, this process done by
domain admin account.
Configuring DHCP
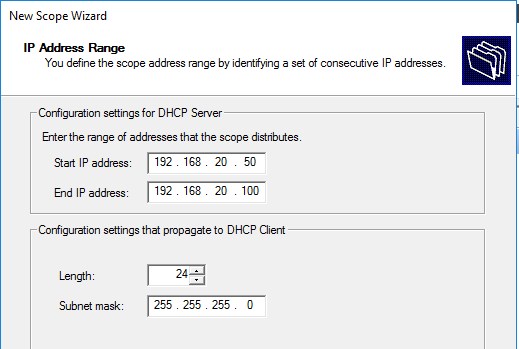
Create and configure new scope
DHCP scope, is a valid range of IP addresses that DHCP server lease to clients,
to add and configure scope options follow instructions as explained below. Run
dhcpmgmt.msc to access DHCP wizard or go to DHCP and right click on DHCP
Manager .
Right click on the IPv4 and select New Scope
You can remove an IP address or
range of IP addresses from the pool of addresses that DHCP server leased, so
you can assign it in static way
By default, DHCP leases set to 8 days, you can increase or decrease it according your requirement
·
At day 0 it will
request a new lease
·
During normal
operation, the client can use the address
·
Halfway the lease
time it will try to renew the lease so it can keep the same IP address.
·
If renewing failed
(DHCP server is offline for example), it will try to extend the current lease
with any active DHCP Server.
Configure most common DHCP
options, also you can do it later
Configure default gateway (DG)
to obtain by DHCP.
Select DNS server to obtained
by DHCP (in our scenario we have domain (DNS Server) named faceitnet.com.au)
which have two DNS servers 192.168.20.3
If we have WINs Server, you can add it here.
DNS maps TCP/IP host names to IP addresses and WINS maps NetBIOS host names to IP addresses.
WINS is an essential part of the Microsoft networking topology. In the older days, you were required to run a WINS server in order to avoid name resolution problems within a Windows network.
Today, DNS has replaced WINS, since Microsoft made changes to
NetBIOS, allowing it to use the TCP/IP stack to perform its job
Activate your scope with
options we configured, or you can activate later
Your configuration successfully
DONE, and DHCP ready to response to DHCP clients.
Now let’s go to DHCP client and test the DHCP configurations.
Test DHCP functionality from Windows Client (Windows 10)
1- DHCPDiscover,
DHCP client send broadcast message to the network to detect the DHCP server.
2-
DHCPOffer, DHCP server which receive the Discover message also send broadcast
message to DHCP client that send the discover message to Offer TCP/IP
configuration.
3-
DHCPRequest,
DHCP client broadcast request that contain accept for offered TCP/IP
configuration.
4-
DHCPACK,
DHCP server replay broadcast with acknowledging client that now you have TCP/IP
configuration with lease duration.
5-
After 50% of
lease time client request DHCP server unicast to renew its lease duration, if
the sever are available, the server will response to the client with unicast
DHCPAck and renew its lease time. If there is a network connectivity problem
between DHCP Server and client, the DHCP client will try again to contact the
DHCP server at 87.5% of lease time for renewal but at this point the process go
broadcast starting from DHCPRequest. If still there are a network connectivity
between DHCP server and its client the sever will lease the client
configuration to another client
First thing first, you need to
remove the DHCP option from VMWare NAT configuration. If you have this enabled
then the client will have two DHCP services and we cannot see the expected
outcome.
Go to Network Configuration and make sure you have removed
the static IP address configuration and selected the Obtain IP address
automatically
Now go to Network Connection again and right click. Go to
Status and confirm the IPs are received from DHCP server
Now let’s go and explore the DHCP service.
DHCP
Scope Options: Address leases
Address leases tab show you computers that obtained TCP/IP
configuration from DHCP server, with information about lease expiration and
clients MAC addresses
DHCP
Exclusion
As we have mentioned earlier, we can exclude IP or rang from
DHCP scope leases here is we can configure this option from this tab, also in
this tab we will see DHCP scope rang, as explained in the figures below.
DHCP
Reservation
You can reserve specific IP address to specific client by assign specific IP to client MAC address, it is useful when you are setting up network devices such as printers, network storage, or server.
First check the MAC address of the device you are going to
reserve the IP Address. Note down the MAC and we will use this in the next
step.
Go to DHCP Reservations
Now go to Desktop client and release and renew the IP to
confirm the reservation is working.
Check the DHCP Address lease and see the different
You can also reserve the IP once the DHCP server leased by
just right clicking on the IP address under Address Leases
DHCP Filter
You can force DHCP to only response to specific clients by
adding MAC addresses to allow list filter, also, you can deny any DHCP client
request from specific computers by adding MAC addresses to deny list filter.
Then
go to Deny and create new Filter


No comments:
Post a Comment