Thursday, 13 December 2018
Monday, 30 October 2017
IPv4 SUBNETTING
IPv4 SUBNETTING

Given network Address 192.168.1.0/24, you have been asked to
use the given network address to do the subneting and configure the network.
Step 1: Always you need to start with the Highest IP
requirement, so the highest IP requirement is 30.
Calculating network address of each network from the given
classful lP address is called VLSM.
To find the classless IP network we have to first find the
required host bits.
2n -2 ³REQUIRED
IP ( n is number of host
bits)
2n -2 ³30
2n ³30+2
2n ³32
2n ³25
n=5
so required number of host bits = 5
that’s bring the subnet mask bits to à 32-5=27
so the network address of first network is 192.168.1.0/27
Since the network address is 192.168.1.0/27 , we should be
able to find the first and last IP address in this network.
To find the first IP address, we need to convert the IP
address to binary format and change all the host bits to zero (0)
192.168.1.0
11000000.10101000.00000001.00000000 (Binary format) in this
first 27 bits are assigned to network and the last 5 bits assigned to Host.
11000000.10101000.00000001.000|00000,
we could see all the host bits are zero so this is the first IP address in this
network, but this is also the network address. There for we cannot use this
address to any end device, this address is used to identify the Network
Network Address = 192.168.1.0/27
Now we need to find the last IP address,
To find the last IP address change all the host bits to one
(1)
11000000.10101000.00000001.000|00000
change the host bits to one
11000000.10101000.00000001.000|11111
when you convert this to Decimal we will get the Last IP address which is
called broadcast address.
11000000 = 192
10101000= 168
00000001= 1
000|11111 = 31
So, the Broadcast IP address is 192.168.1.31/27
So we can conclude this as follows, for 30 IP address
requirement, we need /27 network
Which has a range from 192.168.1.0/27 --- 192.168.1.31/27
______________________________________________________________________________________________________________________________________________________
Now we need to calculate for the second biggest network
2n -2 ³REQUIRED
IP ( n is number of host
bits)
2n -2 ³15
2n ³15+2
2n ³17
since its greater than or equal we can change this to closest 2 to the power
number which is 32 (1,2,4,8,16,32,64,128,256)
2n ³32
2n ³25
n=5
so, required number of host bits = 5
that’s bring the subnet mask bits to à 32-5=27
so the network address of the second network is
we have used up to 31 , that’s mean we can start the next
network from 32.
Network address is : 192.168.1.32/27
Now we need to find the last IP on this network, to do the
calculation we will again convert this Network address to Binary
11000000.10101000.00000001.00100000
Last IP address has all the hosts bits set to one
11000000.10101000.00000001.001| 11111
which is 192.168.1.63 /27 in binary
so the range of the second network is 192.168.1.32/27 ---
192.168.1.63/27
______________________________________________________________________________________________________________________________________________________
Now we can calculate the third network which has a
requirement of 8 IP address
2n -2 ³REQUIRED
IP ( n is number of host
bits)
2n -2 ³8
2n ³8+2
2n ³10 since its greater than or equal we can change
this to closest 2 to the power number which is 16 (1,2,4,8,16,32,64,128,256)
2n ³16
2n ³24
n=4
so, required number of host bits = 4
that’s bring the subnet mask bits to à 32-4=28
so, the network address of the second network is
we have used up to 63, that’s mean we can start the next
network from 64.
Network address is: 192.168.1.64/28
Now we need to find the last IP on this network, to do the
calculation we will again convert this Network address to Binary
11000000.10101000.00000001.0100|0000
Last IP address has all the hosts bits set to one
11000000.10101000.00000001.0100|1111
which is 192.168.1.79 /28 in binary
so the range of the second network is 192.168.1.64/28 ---
192.168.1.79/28
______________________________________________________________________________________________________________________________________________________
similar way we need to calculate to N12,N23,N13, but in this
network we need only 2 IP address.
Thursday, 31 August 2017
How to create roaming user profile ?
How to create roaming user profile ?
We can create roaming profile in 2 different way depends on our need.
1. From Active directory users and computers.
2. From Group policy.
But for both process we need to have a shared location where profiles need to save. And also securing shared location we need to change security permission.
For shared location we create a folder named Roaming profile then right click to the folder name and click on properties.

Go to Properties and Sharing

Click Share this Folder and change the Permissions

Click add and add the following as in the screenshot

Then go and change the permissions
Everyone Only Read Permission.

Domain Admin Full Control
 Authenticated User with Read and Change Permission
 Click OK.
Now go to security tab in Properties.
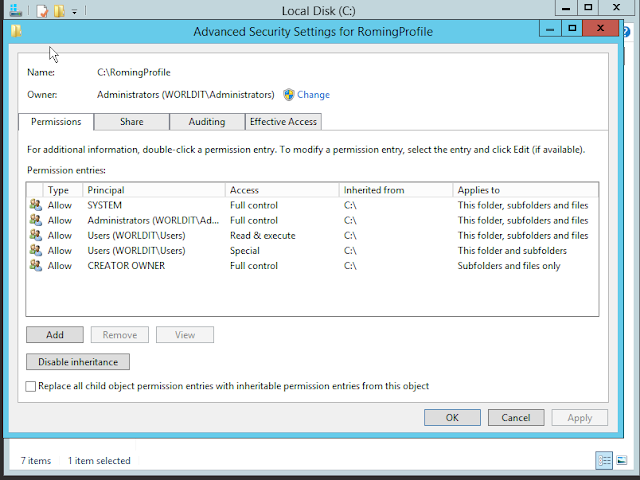
Disable the Inheritance.

We have done the sharing and ready to configure now the Roaming Profile
Lets do
Step 1
1. From Active directory users and computers.
Go to Users and Computers, and select the user you want to configure Roaming Profile.
Right click and go to Properties , Go to Profile Tab.
In Profile Path give your shared folders path with %username%
Type 1:

Type 2 : Find the shared path from the Network Path and copy it.

Using the copied shared network path with %username%

Thats all. we are done.
Method 2:
Using GPO
Create a new Group Policy under Domains and Edit it.

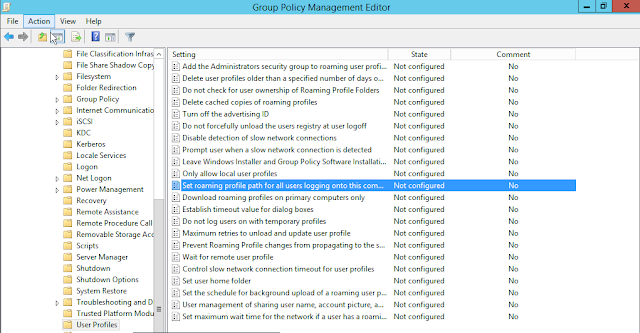
Go to Computer Policy->Computer Configuration->administrative Templates->System->User Profiles.

Enable Set roaming profile path for all users logging into this computer and provide the shared location with %username% then click OK.
Also enable Add the Administrators security group to roaming profiles.

All Done........
We can create roaming profile in 2 different way depends on our need.
1. From Active directory users and computers.
2. From Group policy.
But for both process we need to have a shared location where profiles need to save. And also securing shared location we need to change security permission.
For shared location we create a folder named Roaming profile then right click to the folder name and click on properties.

Go to Properties and Sharing

Click Share this Folder and change the Permissions

Click add and add the following as in the screenshot

Then go and change the permissions
Everyone Only Read Permission.

Domain Admin Full Control


Now go to security tab in Properties.
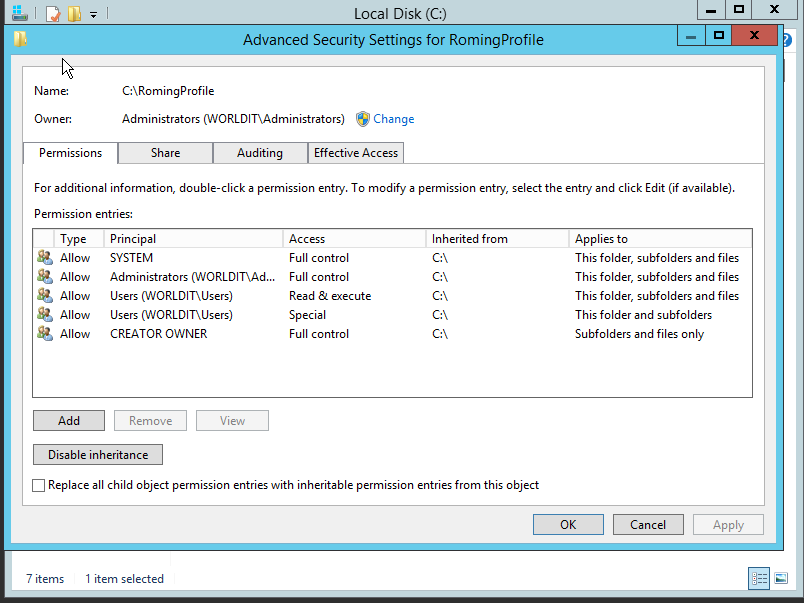
Disable the Inheritance.

We have done the sharing and ready to configure now the Roaming Profile
Lets do
Step 1
1. From Active directory users and computers.
Go to Users and Computers, and select the user you want to configure Roaming Profile.
Right click and go to Properties , Go to Profile Tab.
In Profile Path give your shared folders path with %username%
Type 1:

Type 2 : Find the shared path from the Network Path and copy it.

Using the copied shared network path with %username%

Thats all. we are done.
Method 2:
Using GPO
Create a new Group Policy under Domains and Edit it.

Go to Computer Policy->Computer Configuration->administrative Templates->System->User Profiles.

Enable Set roaming profile path for all users logging into this computer and provide the shared location with %username% then click OK.

Also enable Add the Administrators security group to roaming profiles.

All Done........
Monday, 31 July 2017
Configure Shared office365 MailBox on iPhone Mail app
start setting up a normal exchange account , put your shared email address in the username and you main email account password.
Open Settings
Open "Mail, Contacts, Calendars"
Choose "Add Account..."
Choose "Other"
On the next screen, select "Add Mail Account"
it will fail to do the auto-discover thing , but when you click on continue it eil allow you to manually enter the details :
Name : Hello
email : your shared email a/c address i.e hello@test.com
description :
incoming mail
Host name : outlook.office365.com
username : your main email address / shared i.e Saththiyan@test.com/hello
password : your main account password; i.e password of Saththiyan@test.com
outgoing mail server:
SMTP : smtp.office365.com
username : saththiyan@test.com
password : your main account password, password of Saththiyan@test.com
use ssl
authentication : Password
Wednesday, 14 June 2017
Remote Desktop Profile keep deleting.
I have noticed one issue with RDS service. I created a user and noticed that the user kept me asking twice to configure his email account as it disappeared suddenly.
went through some troubleshooting and found that the user profile is missing under C:\Users on my RDS server user profile.
As per the google search it's a bug in RDS and the way to troubleshoot is deleting registry entry and login again. Even i was able to noticed that the specific user profile was in registry with ".bak"

the registry to delete is , Just right click and delete the Key and log in the user again.
HKEY_LOCAL_MACHINE\SOFTWARE\Microsoft\Windows NT\CurrentVersion\ProfileList

After i logged in i was able to see the registry with out .bak and now i could be able to see that the user profile is in my Users drive.
Thanks.
Sathi
Create new Alias on Office Cloud mail 365.
Hear we go with another new topic,
We all must be wondering how we can save the license cost for number of email account hosted with cloud mail exchange.
Easiest way to save some money is creating an Alias ,
Alias can be given as an email account and it will attached to an email account.
say for an example i got a mail address call test@test.com.au and have an alias call career@test.com
When some one send mail to career@test.com.au it will come to my mail box test@test.com.au but i cannot reply from career@test.com.au
when i reply it will go as test@test.com.au.
lets see how we can setup this...
Login to office 365 mail portal

Click on Admin then go to users
 It will take you users and you need to edit the user

Click on the Edit next to user name and add Alias


We all must be wondering how we can save the license cost for number of email account hosted with cloud mail exchange.
Easiest way to save some money is creating an Alias ,
Alias can be given as an email account and it will attached to an email account.
say for an example i got a mail address call test@test.com.au and have an alias call career@test.com
When some one send mail to career@test.com.au it will come to my mail box test@test.com.au but i cannot reply from career@test.com.au
when i reply it will go as test@test.com.au.
lets see how we can setup this...
Login to office 365 mail portal

Click on Admin then go to users


Click on the Edit next to user name and add Alias

Now add the email you want for Alias

That is all. Alias is ready to use,.....
Thursday, 8 June 2017
Domain Name Transfer
Lets have a look on how we can transfer a domain from one management to another user management.
Before you transfer you must have the following information
1) Domain Password : XXXXXXXX
2) Change the contact mail address : call to the previous company who manages the domain and ask to update the email address , This is where you will get the Authorisation code once the domain transferred. You need this code to complete the transfer.
Now go to GoDaddy.com , click on Domain and then Domain Transfer.

Enter the domain name you want to transfer.

Enter the Authorization code ( Domain Password)

Click Continue and Finish the Transfer.
Now login to your GoDaddy Account and go to domain . Click Transfer

Then click on Manage.

Now you have to login to the email account that you have updated to receive email notification from domain and find the information
Transaction ID: XXXXXXXX
Security Code: XXXXXXXXX
Enter the following information below

Click Add

Click Next

Click Finish , Thats all. Domain is Transferred
Subscribe to:
Posts (Atom)
-
 Subscribe to " FACEITNET " Youtube channel for more interesting videos FaceITNet Youtube Channel Most of us have used Cisco Pa...
 -
<!DOCTYPE html> <html> <head> <meta name="viewport" content="width=device-width, initial-scale=1"...
-
Subscribe to " FACEITNET " Youtube channel for more interesting videos FaceITNet Youtube Channel IDS using SNORT Install...