Monday 23 August 2021

How to check the integrity of the downloaded file?

Subscribe to " FACEITNET " Youtube channel for more interesting videos 

Let's say, you have downloaded an operating system file from the internet and you are wondering whether it is the right file or it's been modified?

Most of the Applications and operating system ISO files today provide the checksum or SHA hash value as well. 

Once you downloaded the file check the SHA values to confirm you have got the file with no modification. 

Let's see how we can check the SHA hash to confirm the integrity of the downloaded file. In windows, you can use the Powershell command Get-FileHash

I have downloaded a file from the internet and saved it in the Download folder and the SHA has they had on the website

SHA1: 968126a78c9b56c019133fac3a5ec9a9c57db9ce 

PS C:\Users\Instructor\Downloads> get-filehash  .\debian-x64-buster-forensics.ova -Algorithm sha1


Alternatively, if you are using either macOS or Linux as your host environment, can calculate the SHA1 of the downloaded file using the following terminal command:  shasum -a1

Terminal: shasum -a1 <file path>


If the calculated SHA1 value does not match the value provided above then you need to redownload or consider downloading from another location 

Saturday 21 August 2021

Setting up Outlook 2016 with gmail GSuite

Subscribe to " FACEITNET " Youtube channel for more interesting videos 

Configuring outlook against google's GSuite is always an issue. 

Many of us wondering why can't simply configure it though they both are very well-known service providers. But still, it's an issue.

In this step-by-step configuration, I will show how to configure outlook 2016 using GMail business. 

First, this is you need to go to your GSuite admin and enable a Less secure app in the google admin for the entire organization. 

To do this. go to your Google admin and Security settings and select "Users to manage their access to less secure app". this may take 24 hours to propagate. 


Then go to your personal mail and click on the profile picture and manage and click Turn on access ( not Recommend) 

then you can see the option to turn on the Less secure app and save the setting. 

Now go to your outlook mail app ( 2016 )  and do the step by step configuration given below

Click Yes to configure 


Select Manual Setup as the outlook is not going to identify the Autodiscovery of Gmail account. 


 ( Make sure in your email settings IMAP is enabled- go to Gmail and settings  ) . 


Select POP or IMAP on outlook configuration 


Select IMAP account Type. 


Go to more settings and Outgoing server select the tick box as given below

In the advance setting tab change the configurations as given below 


You can see how it's configured. 


Thanks all. 


Friday 20 August 2021

Configure Self-Sign Digital Certificate on PaloAlto Firewall

Subscribe to " FACEITNET " Youtube channel for more interesting videos 

First is a self-signed root certificate authority (CA) certificate, which is the top-most certificate in the certificate chain. The Firewall can use this certificate to automatically issue certificates for other uses. In this, you will use the Root CA certificate to generate a new certificate for the Firewall to use for Inbound Management Traffic, replacing the default certificate issued specifically for this environment


login to the firewall by going into the client machine and use the browser 

in the browser enter https://192.168.1.254 ( which is the management IP, 192.168.1.1 is the LAN interface IP) 


then accept the warning and go to the login page and log in with the given username and password 
once logged in 


Navigate to Device > Certificate Management > Certificates


Click on the Generate button


This will generate a certificate for the Firewall to act as a root Certificate Authority (CA). The IP address, 203.0.113.20, used in the Common Name field is the Firewall’s outside IP address. It is best practice that a digest algorithm of sha256 or higher is used for enhanced security. By increasing the default digest to sha512, you have created a much stronger certificate.


Click on the Generate button again 


and add the information, 


In the Generate Certificate window, type lab-management in the Certificate Name field. Then, type 192.168.1.254 in the Common Name field. Next, select lab-firewall in the Signed By dropdown field and make sure to add the certificate Attributes as well. if you forgot to do so then you can't edit and add. you need to delete the certificate and recreate it again.


In the Generate Certificate window, click OK to continue


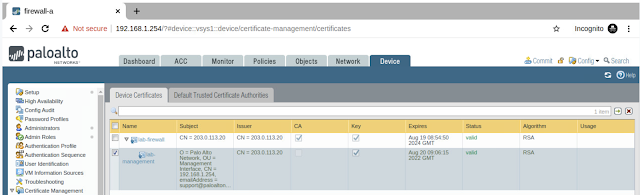
Now we can see both CA Root Certificate and the end level certificate are available on the certificate management. we need. to make a new profile and replace the existing default certificate with the newly created self-sign certificate. 

Navigate to Device > Certificate Management > SSL/TLS Service Profile > Add.


Navigate to Device > Setup > Management


Click the gear icon on the General Settings section, located in the center,In the General Settings window, select Management from the SSL/TLS Service Profile dropdown. Then, click the OK button.


Now the profile is configured and attached to management traffic. 


we need to export the newly configured root CA digital certificate to use on the end device which is going to connect to this firewall. 


Export Certificate and Commit


In the Export Certificate - lab-firewall window, select Base64 Encoded Certificate (PEM) in the File Format dropdown


Save this on the local computer. and commit the change on the firewall, you will see the firewall is going to restart the web services and hang in there at 99%, this is because your browser is still open. close the browser and reopen now. 


Now go to your browser and import the certificate we just downloaded 


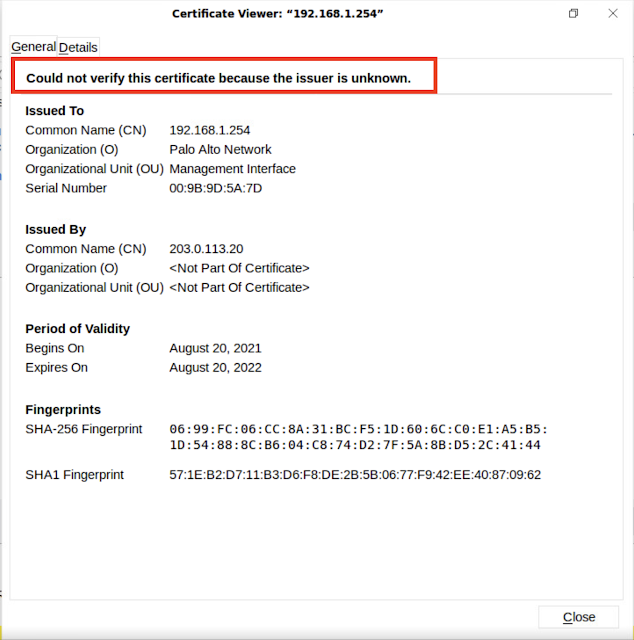
you can see the browser says it could not verify the certificate. because we have not imported this under browser certificates yet.  let's import now. 

Go to browser preference ( this is in firefox) and" Privacy and security " click certificates. 


Click the Trust this CA to identify websites 


you can see the certificate is in the certificate store. 


Relaunch the browser now.  There is no certificate warnning anymore.


Sunday 15 August 2021

How to install the latest version Gophish v0.11.0 on Kali Linux.

Gophish is a powerful, easy-to-use, open-source phishing toolkit meant to help pentesters and businesses conduct real-world phishing simulations.

What is Gophish?

Gophish is a phishing framework that makes the simulation of real-world phishing attacks dead-simple. The idea behind gophish is simple – make industry-grade phishing training available to everyone. “Available” in this case means two things 

  • Affordable – Gophish is open-source software that is completely free for anyone to use.

  • Accessible – Gophish is written in the Go programming language. This has the benefit that gophish releases are compiled binaries with no dependencies. In a nutshell, this makes installation as simple as "download and run"


Http vs Https