Wednesday 11 August 2021

Configure DHCP server with IP filtering and Reservation on server 2016


Dynamic Host Configuration Protocol (DHCP) automatically provides TCP/IP configuration including IP address, subnet mask, DG, DNS server and other parameters. This lab provides the required knowledge to install and manage the DHCP Server

Install DHCP role

We can install DHCP server role through server manager then add roles or from the PowerShell, follow 

All the instructions are in the figures below.


-First option from PowerShell


- Second from Server Manager 

Go to server manager and add the role DHCP and continue the process as usual. This is just installing the service. Once the service is installed you need to configure the DHCP service. 


Now the service has been installed successfully. We need to configure the DHCP service now. 

DHCP Post Installation Configuration

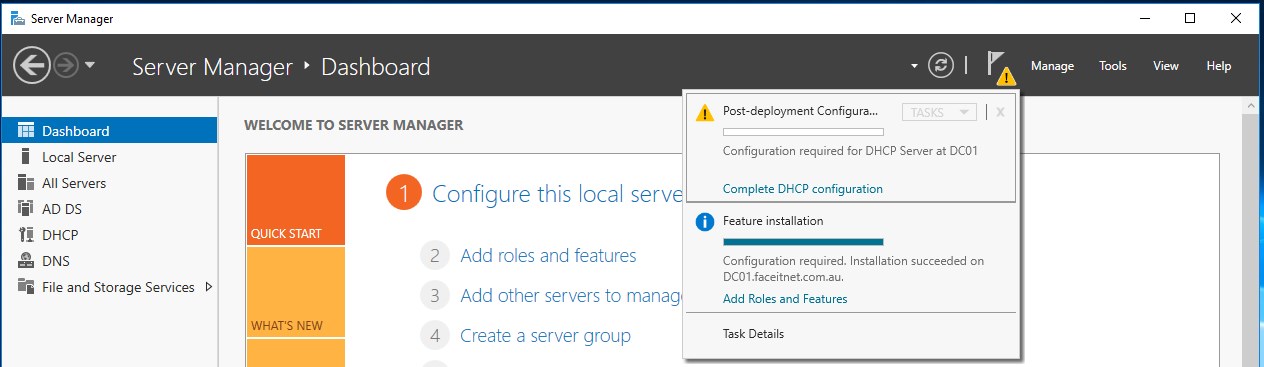
DHCP must be authorized in Active Directory to lease IP addresses to DHCP clients, this process done by domain admin account.


Configuring DHCP

Create and configure new scope DHCP scope, is a valid range of IP addresses that DHCP server lease to clients, to add and configure scope options follow instructions as explained below. Run dhcpmgmt.msc to access DHCP wizard or go to DHCP and right click on DHCP Manager .


Right click on the IPv4 and select New Scope


You can remove an IP address or range of IP addresses from the pool of addresses that DHCP server leased, so you can assign it in static way

By default, DHCP leases set to 8 days, you can increase or decrease it according your requirement

·         At day 0 it will request a new lease

·         During normal operation, the client can use the address

·         Halfway the lease time it will try to renew the lease so it can keep the same IP address.

·         If renewing failed (DHCP server is offline for example), it will try to extend the current lease with any active DHCP Server.

Configure most common DHCP options, also you can do it later

Configure default gateway (DG) to obtain by DHCP.


Select DNS server to obtained by DHCP (in our scenario we have domain (DNS Server) named faceitnet.com.au) which have two DNS servers 192.168.20.3

If we have WINs Server, you can add it here.

DNS maps TCP/IP host names to IP addresses and WINS maps NetBIOS host names to IP addresses.

WINS is an essential part of the Microsoft networking topology. In the older days, you were required to run a WINS server in order to avoid name resolution problems within a Windows network.

Today, DNS has replaced WINS, since Microsoft made changes to NetBIOS, allowing it to use the TCP/IP stack to perform its job

Activate your scope with options we configured, or you can activate later

Your configuration successfully DONE, and DHCP ready to response to DHCP clients.


Now let’s go to DHCP client and test the DHCP configurations. 

Test DHCP functionality from Windows Client (Windows 10) 

1-     DHCPDiscover, DHCP client send broadcast message to the network to detect the DHCP server.

2-     DHCPOffer, DHCP server which receive the Discover message also send broadcast message to DHCP client that send the discover message to Offer TCP/IP configuration.

3-     DHCPRequest, DHCP client broadcast request that contain accept for offered TCP/IP configuration.

4-     DHCPACK, DHCP server replay broadcast with acknowledging client that now you have TCP/IP configuration with lease duration.

5-     After 50% of lease time client request DHCP server unicast to renew its lease duration, if the sever are available, the server will response to the client with unicast DHCPAck and renew its lease time. If there is a network connectivity problem between DHCP Server and client, the DHCP client will try again to contact the DHCP server at 87.5% of lease time for renewal but at this point the process go broadcast starting from DHCPRequest. If still there are a network connectivity between DHCP server and its client the sever will lease the client configuration to another client


First thing first, you need to remove the DHCP option from VMWare NAT configuration. If you have this enabled then the client will have two DHCP services and we cannot see the expected outcome. 


Go to Network Configuration and make sure you have removed the static IP address configuration and selected the Obtain IP address automatically 

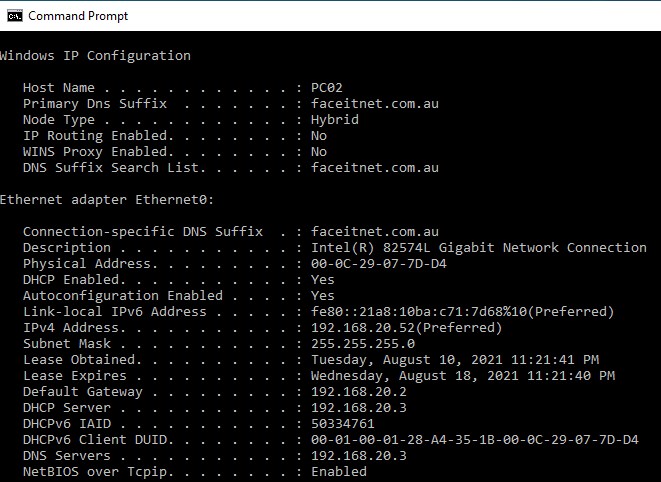
Now go to Network Connection again and right click. Go to Status and confirm the IPs are received from DHCP server


Now let’s go and explore the DHCP service.

DHCP Scope Options: Address leases

Address leases tab show you computers that obtained TCP/IP configuration from DHCP server, with information about lease expiration and clients MAC addresses


DHCP Exclusion

As we have mentioned earlier, we can exclude IP or rang from DHCP scope leases here is we can configure this option from this tab, also in this tab we will see DHCP scope rang, as explained in the figures below.


DHCP Reservation

You can reserve specific IP address to specific client by assign specific IP to client MAC address, it is useful when you are setting up network devices such as printers, network storage, or server.

First check the MAC address of the device you are going to reserve the IP Address. Note down the MAC and we will use this in the next step.

Go to DHCP Reservations


Now go to Desktop client and release and renew the IP to confirm the reservation is working. 

Check the DHCP Address lease and see the different 

You can also reserve the IP once the DHCP server leased by just right clicking on the IP address under Address Leases 

DHCP Filter

You can force DHCP to only response to specific clients by adding MAC addresses to allow list filter, also, you can deny any DHCP client request from specific computers by adding MAC addresses to deny list filter.


Then go to Deny and create new Filter 


Go back to PC02 and do a ipconfig /release and ipconfig /renew again


Sunday 8 August 2021

Extend the RAID 1 in DL380G8

Extend the RAID 1 Storage by adding a new Disk. 


Website Cloning Using SEToolkit on Kali Linux

Social engineering attacks are not breaking into a system directly, instead it is using human social interaction and the attacker is dealing with the victim directly.


Saturday 7 August 2021

Install Kali linux on VMware Workstation 16

Kali Linux is an open-source, Debian-based Linux distribution geared towards various information security tasks, such as Penetration Testing, Security Research, Computer Forensics and Reverse Engineering.

Thursday 5 August 2021

A Free email server configuration (hMail Server)

hMailServer is a free, open source, e-mail server for Microsoft Windows. It's used by Internet service providers, companies, governments, schools and enthusiasts in all parts of the world. 

It supports the common e-mail protocols (IMAP, SMTP and POP3) and can easily be integrated with many existing web mail systems. It has flexible score-based spam protection and can attach to your virus scanner to scan all incoming and outgoing email.

The process cannot access the file because another process has locked a portion of the file - VMware Workstation Pro 16

VMWare Workstation VM not starting because of locked portion of file


Today when i powered on my Windows 10 Virtual Machine had an error message on the screen 


he process cannot access the file because another process has locked a portion of the file

Cannot open the disk 'C:\Users\instructor\Documents\Virtual Machines\Win 10 x64.vmdk' or one of the snapshot disks it depends on.


Module 'Disk' power on failed.


Failed to start the virtual machine.


So how can we fix this error?


Its very simple. Shutdown the virtual Machine and go to the folder where you have saved the Virtual Machine files


Now delete all the .lck files and Folders 


After you deleted the files power on the virtual machine it will work normally. 


Click Yes and then you can see its working. 


Tuesday 3 August 2021

Install Windows Server 2016 Active Directory step by step guide

Install Active Directory on Windows Server 2016 


Lab Objective 


A directory is a hierarchical structure that stores information about objects on the network. A directory service, such as Active Directory Domain Services (AD DS), provides the methods for storing directory data and making this data available to network users and administrators. For example, AD DS stores information about user accounts, such as names, passwords, phone numbers, and so on, and enables other authorized users on the same network to access this information.


This lab explains the process to add and install active directory domain services on windows server 2016. 


- Server Name: DC01 

- IP Address: 192.168.20.4

- DNS: 192.168.20.4

- Domain Name: faceitnet.com.au


Initial Configuration

Before you start active directory installation on windows server 2016, there are some changes its recommended to configure on server including the following: 

- Server fully updated.

- Configure static IP. 

- Create complex password for built-in administrator. 

- Rename server.

- Configure time zone. 

to change previous setting open server manager from start menu and follow the below figure.


The following steps will help you configure your server as an Active Directory Domain Controller on the network. DNS is an integral part of a Microsoft Active Directory Domain and will need to be setup and tested first to ensure it is running properly. All services within a Windows Domain require DNS in order to operate. Microsoft Best Practices specify a minimum of two domain controllers be installed within a domain. Having more than one domain controller allows for redundancy and continued operations even if one of the systems fails. The second system will continue to process user logins and DNS requests, continue to apply Group Policy, and will maintain your Active Directory environment. A single server domain is extremely risky and its’ best to avoid that at all costs.


Install Active Directory on Windows Server 2016 

Install Active directory role

Now our server ready to install active directory domain service, as explained in the figures below


Promoting to Domain Controllers 


Now we can promote the server to be active directory, from server manager follow the figures below


There are three allowed options when you try to promote your server to active directory: 

- Promote your server to be additional DC in existing domain 

- Promote your server to child domain in existing forest 

- Promote your server to new forest (selected for our scenario) 


Select forest and domain functional level to enable additional domain and forest-wide Active Directory features for our scenario select Windows Server 2016, also our domain will play DNS role and global catalog. finally create password for AD restore mode.


Its recommend to change active directory database and log files location from operating system partition.


After prerequisite checked, start installation. Its failed as we don’t have the secure password to Administrator user. You need to reset the password, If you didn’t get this error then you can continue with the next option on your screen. 


Go to Computer Management on your server by right clicking on the start button, then go to local users and groups. In the Users go to administrator and reset the password by right clicking. 


That’s All, Active Directory service is installed. Now let’s see how we can add the client to the domain as a domain member 


To add the client machine to the domain, in this practical I am not using DHCP server on the domain controller hence I must assign the IP address information manually. If you have a DHCP service already running on your network, you don’t need to do this IP addressing manually. 


The first step is confirming the IP address. I am using 192.168.20.250 as the IP address and 192.168.20.2 as the gateway since these machines are running on VMware NAT mode.


Now go to Computer Name/ Domain Changes by running the following steps 

Go to Run (Windows Key +R) and type sysdm.cpl to go to system properties.


Go to Computer Name tab and select Change


You will see the following menu  


In this screen select "Member of" and enter your domain name 


When you click OK the system will ask to enter the domain Administrator user name and password for authentication


After you enter the password and click ok, if everything worked fine you will get the successful message 


Click OK to restart 


When the system boots next time you will be asked to go to domain user account. Now the client is part of the domain network. 


Http vs Https