Sunday, 25 July 2021
First Insider Preview for Windows 11
Windows 11 Insider Preview build to the Dev Channel, Build 22000.51 is released.
You will get to try many, but not all, of the new features showed last week in this early preview. Microsoft will bring more features such as Chat with Microsoft Teams and Android apps in the Microsoft Store over the coming months as they are ready for you
Beautiful, fresh, calm visuals and sounds
From rounded corners to the centering of content and new animations, this new visual design extends across multiple areas of Windows 11

Widgets

Multitasking
Increase your productivity and creativity with these new multitasking features

The new Microsoft Store

Settings

Create Hard Drive Partitions in Windows 10
Create Hard Drive Partitions in Windows 10
Windows 10 Virtual Machine with minimum 100GB hard disk.
Note: Do not try this practical on the local Computer.
Each user might have his or her own opinion on which one is the worst but sure we all consider to be the worst is losing all files after the whole system is corrupted by a strong malware or virus or corrupted disk.
Microsoft actually created tools for protecting, they are called the System Recovery and System Image/Backup and Restore tools
Yes! In order to fully take advantage of these tools, you will need to at least be able to create one drive partition which will serve as the storage for your backup or system image files

In this tutorial we are going to create one hard drive partition in your Windows 10 machine.
First of all we are going to see various ways to access the Disk management tool. You can pick the easiest one for you later on.
1. Launching Disk Management from the Admin/WinX Menu
In order to open this tool, all you need to do is press the Windows + X keys and the tool will appear instantly on the bottom-right portion of your computer screen as you can see being shown below Or you can right click at the start/Windows icon.

2. Disk Management from the Control Panel
You can go to control panel System and Security Administrative Tools Computer Management Disk Management

3. Disk Management from the Universal Settings App
Press the Windows + I keys and the Settings app Window should open. In the search box type “disk management” and shortly you will see “Create and format hard disk partitions”

Now let’s see how to create Hard Disk partition
To start, you will first need to know the drive letter of your machine’s hard drive. It is designated as Drive C: if you haven’t changed the drive letter and if you only have a single partition where the operating system is installed.
You will need to look into the bottom portion where the label “Disk 0” is found
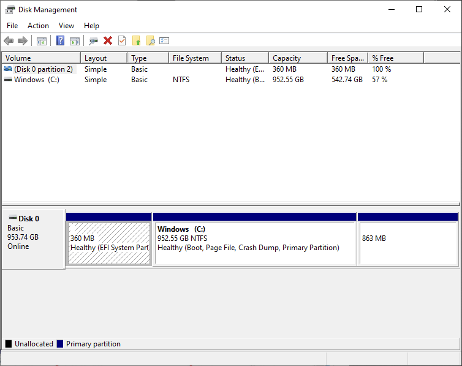
After finding drive (C:), all you need to do is right-click on it in order to access a contextual menu which shows the different options that you can do to the drive. Since we are trying to create a new hard drive partition, what we’ll need to click in the option that says “Shrink Volume” as shown below.


After entering the space desired for the hard disk partition that will be created, you can now click on the button that says “Shrink”

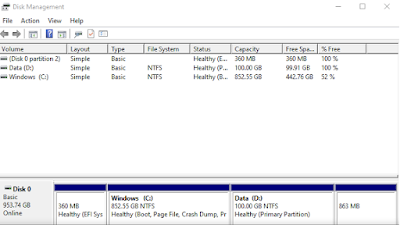
We can see the newly created Disk Partition but it’s not allocated with any portions table and identification

Formatting the Unallocated Space
Now that you’ve successfully separated a total of 100 GB from the existing drive (Drive C:) you will now need to format it so it will appear as a new partition
- Right-click on the unallocated space shown in the Disk Management
- Click on “New Simple Volume…”

Click Next and in the new simple Volume Wizard enter the volume size

Assign a Drive Letter

Now in the format partition menu select the file system, Default is NTSF , You can change the Volume Label to appear in My computer


Windows Server 2012 R2 is Stuck on "Updating Your System"

After some google search i found an interesting step by step guide for workaround, Thank god it worked.
Hera are the work around which worked for me.
I have a Hyper-V environment.
1) Turn off VM.
2) Adjust Autostart Settings (set a 5-second delay). - If not already done.
3) Power on VM in Safe Mode. Press F8 while booting the operating system.

4) Choose "Troubleshoot" then "Command Prompt"
5) Enter the password for a local administrator account.
6) Next, run the following command to see the list of all available drives:
wmic logicaldisk get name
7) Next, we need to navigate to the C:\Windows\WinSxS
cd Windows\Winsxs
8) Next, we need to list all files beginning with "Pending".
dir pending*
9) Next, we need to rename all "Pending" files to append "_old"
ren Pending.xml Pending_old.xml
10) Next, we need to create a new blank "Pending.xml" file
echo > pending.xml
11) Next, we need to navigate to the C:\Windows directory
cd..
12) Next, we need to create a new directory within Windows called "scratch"
mkdir scratch
13) Next, we need to run a DISM command to remove/revert all
DISM /Image:C:\ /Cleanup-Image /RevertPendingActions /scratchdir:C:\Windows\Scratch
14) Next, we need to rename the "SoftwareDistribution" folder to "SoftwareDistributionOLD".
ren C:\Windows\SoftwareDistribution C:\Windows\SoftwareDistributionOLD
15) Next, we need to run a system file checker tool
sfc /scannow
16) Lastly, we need to restart the VM

-
 Subscribe to " FACEITNET " Youtube channel for more interesting videos FaceITNet Youtube Channel Most of us have used Cisco Pa...
 -
<!DOCTYPE html> <html> <head> <meta name="viewport" content="width=device-width, initial-scale=1"...
-
Subscribe to " FACEITNET " Youtube channel for more interesting videos FaceITNet Youtube Channel IDS using SNORT Install...