Create Hard Drive Partitions in Windows 10
Windows 10 Virtual Machine with minimum 100GB hard disk.
Note: Do not try this practical on the local Computer.
Each user might have his or her own opinion on which one is the worst but sure we all consider to be the worst is losing all files after the whole system is corrupted by a strong malware or virus or corrupted disk.
Microsoft actually created tools for protecting, they are called the System Recovery and System Image/Backup and Restore tools
Yes! In order to fully take advantage of these tools, you will need to at least be able to create one drive partition which will serve as the storage for your backup or system image files

In this tutorial we are going to create one hard drive partition in your Windows 10 machine.
First of all we are going to see various ways to access the Disk management tool. You can pick the easiest one for you later on.
1. Launching Disk Management from the Admin/WinX Menu
In order to open this tool, all you need to do is press the Windows + X keys and the tool will appear instantly on the bottom-right portion of your computer screen as you can see being shown below Or you can right click at the start/Windows icon.

2. Disk Management from the Control Panel
You can go to control panel System and Security Administrative Tools Computer Management Disk Management

3. Disk Management from the Universal Settings App
Press the Windows + I keys and the Settings app Window should open. In the search box type “disk management” and shortly you will see “Create and format hard disk partitions”

Now let’s see how to create Hard Disk partition
To start, you will first need to know the drive letter of your machine’s hard drive. It is designated as Drive C: if you haven’t changed the drive letter and if you only have a single partition where the operating system is installed.
You will need to look into the bottom portion where the label “Disk 0” is found
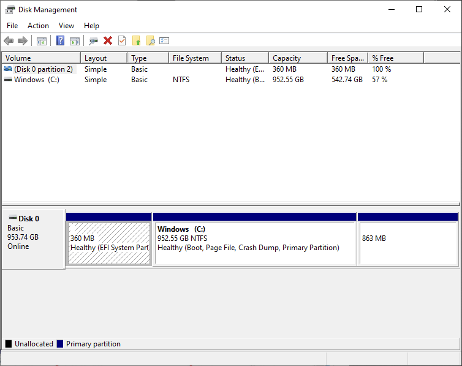
After finding drive (C:), all you need to do is right-click on it in order to access a contextual menu which shows the different options that you can do to the drive. Since we are trying to create a new hard drive partition, what we’ll need to click in the option that says “Shrink Volume” as shown below.


After entering the space desired for the hard disk partition that will be created, you can now click on the button that says “Shrink”

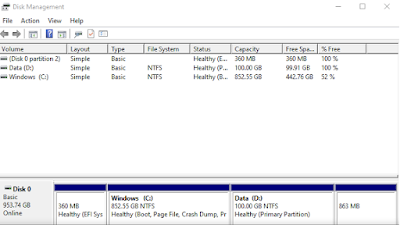
We can see the newly created Disk Partition but it’s not allocated with any portions table and identification

Formatting the Unallocated Space
Now that you’ve successfully separated a total of 100 GB from the existing drive (Drive C:) you will now need to format it so it will appear as a new partition
- Right-click on the unallocated space shown in the Disk Management
- Click on “New Simple Volume…”

Click Next and in the new simple Volume Wizard enter the volume size

Assign a Drive Letter

Now in the format partition menu select the file system, Default is NTSF , You can change the Volume Label to appear in My computer


No comments:
Post a Comment