Thursday 1 June 2017

Install Zimbra 8.6 on Ubuntu 15.04 Server


Install Zimbra 8.6 on Ubuntu 15.04

The Zimbra Collaboration Server is a mail server, collaborative web application and a web based mail server admin console in a single application. It provides LDAP, antivirus, antispam, collaboration features and a ajax webmail client. Zimbra is easy to use for administrators as well as end users due to its fast Ajax based web interface.

Prerequisites
• Ubuntu Server 15.04 - 64bit
• root privileges
• Free space 25 GB
• RAM 4 GB

My zimbra Server profile used in this Lab

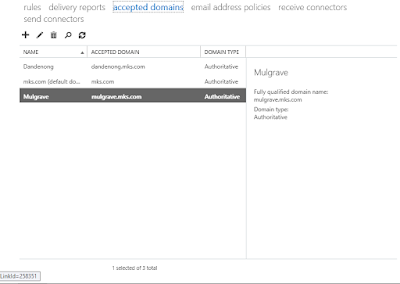
Domain : faceitnet.com.au
IP : 192.168.200.10
Mail : mail.faceitnet.com.au


-->


Installation of prerequisites
connect to your server, get root privileges and install this package.
-->
apt-get install libgmp10 libperl5.18 unzip pax sysstat sqlite3 dnsmasq wget


Configure hostname and DNS Server

Step 1 - Edit hostname and hosts
vim /etc/hostname
-->
change your hostname with this 'zimbramail.faceitnet.com.au'.


vim /etc/hosts
add this line:
-->
192.168.200.10   zimbramail.faceitnet.com.au zimbramail


Step 2 - Edit dnsmasq configuration
-->
vim /etc/dnsmasq.conf
-->
server=192.168.200.10
domain=faceitnet.com.au
mx-host=faceitnet.com.au, zimbramail.faceitnet.com.au, 5
mx-host= zimbramail.faceitnet.com.au, zimbramail.faceitnet.com.au, 5
listen-address=127.0.0.1

-->
Reboot

Installing Zimbra

Step 1 - Download Zimbra and extract it
Download using the following command if Download doesn’t work then download manually and upload to server using FTP service. (Need to configure FTP)
--> wget https://files.zimbra.com/downloads/8.6.0_GA/zcs-8.6.0_GA_1153.UBUNTU14_64.20141215151116.tgz

Extract the file using the following command:


Change the directory to extracted directory:
-->
cd zcs*

-->
Now install the package by run the ./install.sh command


-->
Continue the installation by Pressing Y


-->
You need to wait, because this installation takes some time.


-->

next step is configure "zimbra-store" for getting admin password.


-->
In my configuration you could see my Master DNS IP address was not configured, so I had to configure it to finish the configuration, Until that you will not be permitted to Apply configuration ( a to apply Configuration )

It will take some time to finalize all the configuration


Testing Zimbra
To test your zimbra server is running, you can type a command
su - zimbra
zmcontrol status
-->
try to access zimbra from web browser.  https://192.168.200.10/

-->

or try admin page " https://192.168.200.10:7071/ ".


-->
Once you have configured the Zimbra mail server, test the server by sending mails from two acceounts that you have created.
-->

Friday 28 October 2016

Windows 8.1 Update (KB2919355) is not applicable to your computer

Subscribe to " FACEITNET " Youtube channel for more interesting videos 

Windows 8.1 Update (KB2919355) is not applicable to your computer


Unable to install Windows 8.1 Update (KB2919355) on your server 2012R2 ( installing Sharepoint 2016) Even if you’ve enabled automatic update in Windows, you might find out that KB2919355 doesn’t appear in the list of available updates. 

If you download KB2919355 directly from Microsoft’s online website and then install it manually, Windows Update Standalone Installer will fail with the error message “The update is not applicable to your computer“.


So what we can do now???? 

What is KB2919355???
    Windows 8.1 Update is a cumulative set of security updates, critical updates and updates. You must install Windows 8.1 Update to ensure that your computer can continue to receive future Windows Updates, including security updates. For a complete listing of the issues that are included in this update, see the associated Microsoft Knowledge Base article for more information. After you install this item, you may have to restart your computer.

How to Install Windows 8.1 Update (KB2919355) Successfully?

In Windows Update window, click on the Check for updates link in the left pane. The search may take some time, depending on how many updates are waiting.

When the search is finished, click the link that says how many important updates are available.

In the list of available updates, select the update KB2919355, then click Install and you’re done! However, if the update KB2919355 doesn’t appear in the list of available updates, check ALL important updates and click Install.

After installing all available important updates, open your Web browse to download the Windows 8.1 Update from Microsoft’s website:

http://www.microsoft.com/en-us/download/details.aspx?id=42334


Now double-click on the update KB2919355 you’ve downloaded and it should be able to be installed successfully.


Installing  successfully, it would take time to finish as its even though Microsoft doesn't call its Service Pack but its a Service Pack....

Thanks 


Tuesday 25 October 2016

Multi Tenant Email Server Configuration

Multi Tenant Email Server Configuration


In this tutorial I am going to explain how to host multiple email domains on one Domain controller and Exchange server. 

Say for example , A company have two Branches and they are namely Dandenong and Mulgrave. The company doesn't want to have common email address. They want to have emails specifically branches 

So the users in Dandenong will have their mail address as user@dande.mks.com.au and the user in Mulgrave will have user@mul.mks.com.au. We can do the same to even different domains , Lets see how we can do this...

First of all to do this we need to have UPN ( user principle names ) and OU ( organizational units ) to create emails and user account. Lets see how we can do this 

Create OUs

1.    . Navigated to ‘Active Directory Users and Computers’ and created OUs for Dandenong and Mulgrave:

2.    Created two users in each OU, Mulgrave One and Two for the Mulgrave OU, and Dandenong One and Two for the Dandenong OU:


       Create UPNs: 

       Navigated to ‘Active Directory Domains and Trusts’:

           Right-clicked ‘Active Directory Domains and Trusts’ and selected ‘Properties’. Added ‘mulgrave.mks.com’ and ‘dandenong.mks.com’ as alternate UPN suffixes and clicked ‘Apply’ and ‘OK’:


       On the Exchange server : 

   Navigated to ‘Accepted Domains’ and added the        ‘dandenong.mks.com’ and 'Mulgrave.mks.com' UPN as an accepted        domain on the Exchange server:


Create Email Policy     

Navigated to the Exchange Administration Centre, and went to ‘Mail Flow > Email Address Policies’:

     Under ‘Email Address Format’, changed the address format to      ‘dandenong.mks.com’


Under ‘Apply to’, added a new rule and selected ‘Recipient Container’. Selected the previously created ‘Dandenong’ OU and clicked ‘Save’


Created a new email policy named ‘Mulgrave’ and repeated Steps for the ‘Mulgrave’ OU:


Created Users Email


     Navigated to ‘Recipients’ on the Exchange Admin Centre and added the Dandenong One, Dandenong Two, Mulgrave One and Mulgrave Two users from the OUs previous created:


   Noted that each user had the proper sub-domain applied as their email address, so the Email Policies had been applied successfully:


** Thanks Tim Rees  **

Tuesday 11 October 2016

Configuring VoIP Basic level Packet Tracer

Configuring VoIP  Basic level Packet Tracer


Cisco Unified Call Manager Express to configure a basic VoIP. 

So the first thing to be done is to configure the IP address of the router:

Router>enable
Router#configure terminal
Router(config)#interface FastEthernet0/0
Router(config-if)#ip address 192.168.100.1 255.255.255.0
Router(config-if)#no shutdown


A DHCP server is used to assign IP addresses to the IP Phones.

A TFTP server is used to allow the phones to get the firmware and certain configurations files from the router, this is done by the option 150 of the DHCP.

Router(config)#ip dhcp pool VOICE
Router(dhcp-config)#network 192.168.100.0 255.255.255.0
Router(dhcp-config)#default-router 192.168.100.1
Router(dhcp-config)#option 150 ip 192.168.100.1


Next step to do is to configure the Call Manager Express itself on the router

Router(config)#telephony-service
Router(config-telephony)#max-dn 5
Router(config-telephony)#max-ephones 5
Router(config-telephony)#ip source-address 192.168.100.1 port 2000
Router(config-telephony)#auto assign 1 to 5

1. Enters to the telephony services, if you don't have the telephony-service you have to enable by      typing the following in 2911 serious router. 

Note: license boot module c2900 technology-package uck9 

2. max number of phone lines

3. max number of telephones

4. The IP of the router, this is where the telephones will be registered and the source address where is running the DHCP and TFTP services, which will be the router itself. And the port used for the phones, the default one is 2000

5. This is to automatically register the phones, on this case is from phone 1 to 5 

Router(config)#ephone-dn 1
Router(config-ephone-dn)#number 100

Router(config)#ephone-dn 2
Router(config-ephone-dn)#number 200

Router(config)#ephone-dn 3
Router(config-ephone-dn)#number 300

Router(config)#ephone-dn 4
Router(config-ephone-dn)#number 400

Router(config)#ephone-dn 5
Router(config-ephone-dn)#number 500


We have configured 5 max IP Phones, so we will configure 5 max numbers for the line, 

Now thats all on the router, we have to configure the switch to access Voice VLAN. 

Switch(config)#int range fastEthernet 0/2-3
Switch(config-if-range)#switchport mode access
Switch(config-if-range)#switchport voice vlan 1

Interface 1 I have configured as Trunk interface 

Switch ( config) #int fastEthernet 0 /1
Switch(config-if)#switchport mode trunk 

If the encapsulation is Dot1q then just leave it as it is

That is all , now we must have our Phones configured with the numbers we have configured above 


Monday 29 August 2016

Configure SSH access on a CISCO Router

Configure SSH access on a CISCO Router


There is only a way to access a cisco device physically is Console access ( of course we have USB now). But what if we have the Router or Switch in a remote location? 

We have to use Telnet to access the Router but Telnet is not a secure way of communication as the Username and Password transmit plane text format, Which is easy to capture the credentials. So we have to have a secure way of accessing the remote devices. This is where SSH comes in. SSH is a secure way of remote access with RSA encryption. Lets see how we can do configure SSH on a CISCO device

Login to the Router using console or Telnet and configure the following 

first we need to Configure the Basic configurations. 

1.Set hostname and domain-name
   Router>Enable
   Router#configure Terminal
   Router(Config)#hostname lab5
   Lab5(config)#ip domain-name lab5.com
   Lab5(config)#enable secret cisco123
   Lab5(config)#username XXXX privilege 15 secret XXXX

Now we have to configure RSA , if we use version 2 then we have to use 512 or above bits of encryption.

2.Generate the RSA Keys
   Router(config)#crypto key generate rsa
The name for the keys will be: lab5.com
 Choose the size of the key modulus in the range of 360 to 2048 for your
   General Purpose Keys. Choosing a key modulus greater than 512 may take
   a few minutes.

How many bits in the modulus [512]: 1024
 % Generating 1024 bit RSA keys, keys will be non-exportable...[OK]

3.Next setup VTY line 

Lab5(config)#line vty 0 4
Lab5(config-line)#login local
Lab5(config-line)#transport input ssh

4. Setup IP

Lab5(Config)# int g0/1
Lab5(Config-if)#ip add 192.168.100.1 255.255.255.0
Lab5(Config-if)#no shutdown


Thats all , Use the Putty or CMD to connect your Router

In CMD use SSH  -l Username IPaddress

Friday 26 August 2016

How to configure and install self signed digital certificate on Exchange server 2013( No Certificate Authority )

How to configure and install self signed digital certificate on Exchange server 2013( No Certificate Authority ) 

After successfully installed exchange server every time when we go to OWA or ECP we could notice that it  says certificate error .

Here is how we can fix it..

First login to Exchange ECP and go to server and click Certificate

Click on the + and create new certificate

Make sure you have to select option two ( Create a self-signed certificate) and enter the friendly name.

Then on the next screen specify the server where you want to apply this certificate , In my case i will install on my mail server WIN2k12MAIL

Now click next and Specify the Domains you want to include, Click on Pencil and add the names...

Here i am adding for both intranet and Internet


Click Ok and move on to confirmation page

Click Finish, that is all we have created a new certificate

Click on the newly created certificate and assign the services, here i have assigned to IMAP and POP

Now we need to tell our IIS server to use this certificate to email server web request to do that, Go to IIS server

Go to Sites and then click default web sites
 
Click Add

Select HTTPS as Type and give your host name and then select the newly created certificate on the drop down menu. Then click ok and also restart the web service..
Now go to Exchange web access and you will still see the certificate error, Click on the certificate and install to Trust root..

Click install certificate

Select Local computer and select Trusted root


That is all close the web browser and reopen you should see the following screen now


Click on the Lock icon on the web browser and open the certificate , Subject alternative names

You can see the given domain names are there...

Thanks


Monday 22 August 2016

Configure Audit Logon Events Policy in a GPO

Configure Audit Logon Events Policy in a GPO


Step by Step Guide

1)   Log on to Domain Controller with an account that has Administrator rights.    Ensure that the Group Policy snap-in is installed.

2)   Press “Win + R”, type gpedit.msc and press the Enter button to open Windows Group Policy Editor.

3)  Once you are in the Group Policy Editor, navigate to “Computer Configuration Windows Settings -> Security Settings -> Local Policies” and then select “Audit Policy” in the left pane.


4) Once the Window is opened, select both the check boxes “Success” and “Failure.” Now click on the “Apply” and “Ok” buttons to save the changes.


5) Once its Done go to event viewer and Check under Security....

Http vs Https