Sunday 21 August 2016

How to configure Windows Event Log Forwarding

How to configure Windows Event Log Forwarding


In a small and medium level business your budged will not allow you to buy and run a dedicated event reader. Since these days business depend on multiple servers and services its not easy for a system administrator to read all the events separately  on the servers. 

For this kind of situations Microsoft introduced Event Forwarding. Event Forwarding allows administrators to get events from remote computers, also called source computers or forwarding computers and store them on a central server; the collector computer.

Events can be transferred from the forwarding computers to the collector computer in one of two ways:

Collector initiated – Using this method, the collector will contact the source computers (clients) and ask them for any events they might have. The minimum operating system level required on the source computers is Windows XP SP2 with minimum Windows Remote Management 1.1 installed.

Source initiated – By using this method the clients or forwarders transfer events to the collector as required. Systems like Windows Vista, Windows 7, Windows Server 2008/R2 and Windows Server 2012/R2 can be Event Collectors, but this feature is not supported for down-level operating systems. Even tough there are no limitations when a client operating system is used as an Event Collector, a server platform is recommended since will scale much better in high volume scenarios.
(http://www.vkernel.ro/blog/how-to-configure-windows-event-log-forwarding)

Configuring event forwarding collector initiated subscriptions ( Step by Steps ) 
Let’s start by enabling WinRM on the Event Forwarders machines (the clients); and we have two choices here: we either use Group Policy to enable WinRM or we do it manually by issuing the bellow command on a client by client basis:

In my Example i have used WIN2K12MAIL as client.

winrm qc
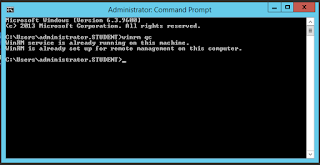
If your clients are running Windows server 2012 and above, WinRM it’s enabled by default on them, but just to be sure, you can check the configuration using the bellow command line:


winrm get winrm/config
Now that WinRM it’s enabled on all our Event Forwarder computers
Now we have to configure Collector computer rights to read the logs from this computers
We can use the Event Collector computer account itself for authentication, or we can create a user account in Active Directory and use that
I have created an account called eventforwarder and added this to the default Event Log Readers Group.
Creating new user eventforwarder 
 
Adding eventforwarder to default Event Log Readers Group

The next step is to enable and start the event collector service on the collector machine, so i have logged in to WIN2k12DC server and issue the bellow command:
wecutil qc

Continue and if its Success let’s move forward and create a subscription on the collector computer which “tells” this one for what type of event logs to look for and collect from the forwarder computers
GO to Event Viewer and Right click on Subscription, Create new Subscription
Now click the Collector initiated radio button then hit Select Computers to add the source computers/forwarders from which the collector will pull the events
Now we have to select what events we wants to receive, so click on  Select Events button
The last step to make this work is to configure the account used by the collector machine to connect to clients. We already added this account to the local Event Log Readers group on every forwarder, so we should not have access problems.
Click the Specific User button, provide the account and credentials and click OK, then move down to the Event Delivery Optimization section where we have three options:
Normal This option ensures reliable delivery of events and does not attempt to conserve bandwidth.It gets the events every 15 minutes by using a pull delivery mode.
Minimize Bandwidth – This option ensures that the use of network bandwidth for event delivery is strictly controlled.
It uses push delivery mode and it uses a heartbeat interval of 6 hours.
Minimize Latency – This option ensures that events are delivered with minimal delay. It is an appropriate choice if you are collecting alerts or critical events. It uses push delivery mode every of 30 seconds.
I have done this way but it didn't work, Access Denied , So i have changed the User access to 
Administrator and it worked ..
Didn't work 
The one worked 
Now i can see the Forwarder is been added 
After ~10 minutes or less, depending on how you configured the Event Delivery Optimization options, logs should start coming in
That is all. Its working ...


Friday 19 August 2016

Install Exchange server 2013 with AD 2012 R2

In this Tutorial i ll explain how to install Exchange server 2013 Step by Step with Active Directory Domain Controller 2012R2 server.


My Lab is in NAT mode on VMware Workstation.

  1. Exchange Server Hostname : WIN2k12MAIL 
  2. ADDC : WIN2K12DC
IP Address are follows 
ADDC  
 IP 192.168.200.10
 GW: 192.168.200.2 ( NAT GATEWAY)
 DNS: 192.168.200.10, 192.168.200.2

Exchange 
 IP 192.168.200.20
 GW: 192.168.200.2 ( NAT GATEWAY)
 DNS: 192.168.200.10, 192.168.200.2

Make sure to have the latest updates on both the servers 


Install and configure AD on the WIN2K12DC and Join the Mail server as a member. Once its joined it will ask to restart the server , Restart it. Once its boot up you need to login to mail server as DOMAIN Administrator ( Domain name \ Administrator,) in my case i ll use student\Administrator. My domain name is Student.edu.au. 


Make sure the Firewall is properly configured for testing I have disabled the firewall. 


On the DC we have to create the following under DNS. 


Go to DNS manager and add the following records. 


Create a CNAME to point the WIN2K12MAIL as MAIL
create a MX record to point WIN2K12MAIL. 


Once its done go back to your mail server and do a ping to DOMAIN name like Ping student.edu.au, this should response with the DC's IP address then go back to the Exchange ( mail server) and do a NSLOOKUP to mail.student.edu.au, this should reply your mail server's IP address. If not check your DNS configurations.


Once all of this done. we will move to mail server to install the exchange server 2013. 


Exchange server 2013 needs few prerequisites to be installed before it starts. 


Prerequisites


  1)Download and install Microsoft Unified Communications Managed API 4.0, Core Runtime 64-bit in Mail Server 


  2)Download and install Microsoft Office 2010 Filter Pack 64 bit in Mail Server


 3)Download and install Microsoft Office 2010 Filter Pack SP1 64 bit in Mail Server.


 4)Install .NET Framework 3.5 in Mail Server. In most cases, this feature is installed by default if not install using power shell


You must mount the Windows server 2012R2 image to run this command 
Install-WindowsFeature NET-Framework-Core -Source D:\sources\sxs


 5)  Run the following command in Windows Power Shell to install other required components.

Install-WindowsFeature RSAT-ADDS-Tools, AS-HTTP-Activation, Desktop-Experience, NET-Framework-45-Features, RPC-over-HTTP-proxy, RSAT-Clustering, RSAT-Clustering-CmdInterface, RSAT-Clustering-Mgmt, RSAT-Clustering-PowerShell, Web-Mgmt-Console, WAS-Process-Model, Web-Asp-Net45, Web-Basic-Auth, Web-Client-Auth, Web-Digest-Auth, Web-Dir-Browsing, Web-Dyn-Compression, Web-Http-Errors, Web-Http-Logging, Web-Http-Redirect, Web-Http-Tracing, Web-ISAPI-Ext, Web-ISAPI-Filter, Web-Lgcy-Mgmt-Console, Web-Metabase, Web-Mgmt-Console, Web-Mgmt-Service, Web-Net-Ext45, Web-Request-Monitor, Web-Server, Web-Stat-Compression, Web-Static-Content, Web-Windows-Auth, Web-WMI, Windows-Identity-Foundation


6) Prepare the schema by using the following command 
Mount the Exchange 2013 and type the command
PS C:\Users\administrator.STUDENT> D:
PS D:\> .\Setup.EXE /PS /IAcceptExchangeServerLicenseTerms
Done:
Step By Step guide : 

1) Domain Controller's IP configuration


2) Exchange Server IP Configuration 


3) Join the Exchange to Domain


4) Login , Click Other Users 


5)Login as Domain Admin 


6) Install Dependencies

 
7) Install windows Features as mentioned Above


8) Restart the server 


9) Install .net 3.5 ( I am using power shell commends ) , Mount the Windows server 2012R2


10) Run the power shell command 


Done:


11) Once its done install Exchange server 2012 using setup.exe file. 


12) Double Click on the DVD Drive.


13) Continue the installation upto this point 


14) Make sure to tick all the options, Click next and wait till the next screen comes


15) Give any name relevant to your Organization , Doesn't need to be your domain name


16) Make sure to enable Malware scanning and Click next. 


17)  Installation has started and it may take up to 45 min to finish the installation. 


18)  Once the installation is finished, will open the ECP and add few email accounts to test the email server. 


 You can create Receive connectors in the Transport service on Mailbox servers, the Front End Transport service on      Mailbox servers, and on Edge Transport servers. By default, the Receive connectors that are required for inbound mail flow are created automatically when you install an Exchange 2016 Mailbox server, and when you subscribe an Edge Transport server to your Exchange organization.
Until you create a Send connector, mail can't flow from your Exchange to the Internet.
The first thing is that the Exchange Management Console is gone, however we still have Exchange Toolbox  and that GUI has some of the tools that we have been using for ages such as Remote Connectivity Analyzer and Queue Viewer. 


It will load the ECP on internet Explorer or on your default Browser

Click continue   as it is warning for Certificate. On the next blog i ll explain how to create self signed certificate and avoid this Warring 


Now that i can see my ECP is loaded, will go create new mail accounts. 


19) Now we will create some email accounts, we can create email accounts in two ways , We can create new user account on the AD under users and add them on exchange as existing users. Or else we can create new user on exchange and that will create the use account under the AD users. 


Creating existing user 


So i have created two mail account. will test the account by sending mails 

To send and receive mails i will use the Outlook Web Access (OWA) in this case, Later on i ll show how we can do it on a mail client. 
to go to OWA , you can use the following URL. if you try on your exchange then use https://localhost/owa 
if  you use another machine then type your FQDN or use your CNAME , 
Eg ; win2k12mail.student.edu.au/owa or mail.student.edu.au/owa  (mail is a CNAME for win2k12mail.)


Login to OWA and send mail. here we go bingo its  working 

That is all, my mail server is working well... Will configure this on Thunderbird and see how does it work..

Download and install Thunderbird from the website and configure 

https://www.mozilla.org/en-US/thunderbird/

Add the account 


Once the account is added we can see the mail that we send from Sathi to Sara will be there in the inbox.

So Thunderbird found the account and the mail server. Click Done, it will ask to confirm the certificate, Click confirm. 


Add the second account also... Now all is done.....


see the next post to configure self-signed Digital certificate....


https://faceitnet.blogspot.com.au/2016/08/how-to-configure-and-install-self.html


Thanks 

Saththiyan 


Friday 21 August 2015

how to hide folder name from url (using .htaccess)

Subscribe to " FACEITNET " Youtube channel for more interesting videos 

How to hide folder name from url (using .htaccess)


This will assume you have http://domain.com/cabinet as where the content you want to load is.
And the resulting URL to only show http://domain.com but still load the content in in the /cabinet folder

First of all login to your hosting server using FTP and find the .htaccess under public_html

Click Edit and add the following lines, save and refresh the page, now go back to your website URL and try now....

RewriteEngine on
RewriteCond %{REQUEST_URI} !^/(cabinet)
RewriteRule (.*) /cabinet/$1

Cool , Say Thanks if works for you....

Saturday 13 September 2014

Mini PC - Intel® NUC Kit DN2820FYKH Wireless installation.

Mini PC - Intel® NUC Kit DN2820FYKH Wireless installation.


I suggest you download this to your desktop:http://www.kernel.org/pub/linux/kernel/projects/backports/stable/v3.11-rc3/backports-3.11-rc3-1.tar.bz2 Right-click it and select 'Extract Here.' Now open a terminal and do:
cd Desktop/backports-3.11-rc3-1/
make defconfig-iwlwifi
make
sudo make install
Now download the required firmware here:https://git.kernel.org/cgit/linux/kernel/git/egrumbach/linux-firmware.git/plain/iwlwifi-7260-7.ucodeNow open a terminal and do:
sudo cp ~/Desktop/iwlwifi-7260-7.ucode /lib/firmware/  <--or -r="" code="" downloaded="" f="" is="" it="" iwldvm="" iwlwifi="" loaded="" modprobe="" not="" ok="" please="" proceed="" sudo="" wherever="" you="">
Your wireless should now be working


Monday 30 June 2014

Access an additional Disk from C Drive

Getting a new drive is always exiting, but having 6 or 7 drives show up in My Computer isnt always ideal. Using this trick you can make your drives appear as folders on a another drive. Logically it will look like its one drive but any files in that folder will physically be on another drive


Tuesday 14 January 2014

Windows server core command prompt

In this post i wanted to share some few commands which i have used in the recent past time, i hope this will be helpful to those who has core windows OS.

To configure the IP address , first we need to check the interfaces (NIC)
use the following command to see the attached interfaces

netsh interface ipv4 show interfaces 

Now we can see the interfaces
lets see how we are going to configure IP address to local area connection 2

netsh interface ipv4 set address name="local area connection2"  source=static address=10.1.1.10 mask=255.255.255.0 gateway=10.1.1.1

look still we haven't configured the DNS details, so we will see how we can configure DNS

netsh interface ipv4 add dnsserver name="local area conncetion2" address= 10.1.1.30 index=1 

I am sure you can understand we are configuring DNS on local area connection 2 interface but what is that INDEX=1??

Since we all know that there is always we have primary and secondary DNS so the index 1 says us that we are configuring this IP address as primary DNS. 

now after we configured the IP address details we are going to add this server to domain, so before add the server to domain we have to check the hostname and change the hostname to a meaning full name. 

So we will see how to do this. 
to check the hostname simply type "hostname" and hit enter it will display the configured hostname, So its all fine now we need to change the hostname. Here we go 

netdom renamecomputer  /newname: /userd:Administrator /passwordd:  /reboot:1

this will ask to enter the password of the Administrator user and immediately reboot the server (reboot=1) 

now we have changed the hostname and going to add this server to domain,
netdom join /domain:test.com.au /userd:Administrator /passwordd: /reboot:5

this will add the host to domain test.com.au and reboot the server in 5 seconds.

So now we have configured the IP address, changed the hostname and added the server to Domain , now what else we have to do more? Yes we need the user account to access the server, Lets configure that also.

net user User1 /add
this will ask you to enter the password for the newly created user called user1, now we will add this user to administrator group 

net localgroup administrators /add user1

That is all we have done it. The same configuration we can do easily if we use the following command 
>sconfig  this will prompt you with all the options , simply we have to select the option number and enter the relevant details. 


Thursday 19 December 2013

Useful Linux commands

Here i am going to explain few useful linux commands which may be really handy when you need to troubleshoot sometimes.

First of all linux has every configuration file as  text file, so its really easy to modify as you like,

Firstly we will have a look on Users, Groups , Permissions,

Here we go first with Users,

In linux its really easy to create users and edit the user, Its all text file, Just like adding words in a word file.

To create user :

Remember we need to use always SUDO its like "super user do the work"

sudo adduser

to delete a user

sudo userdel

and this user details are stored in a file call Passwd which is in /etc/passwd location

using a text editor we can open the file and have a look.

sodo vi /etc/passwd this is where you can see all the created users and the system default users,

so you may think then where is the password to this user, you can see when you add a user the system the system will ask you to enter all the password , firstname, lastname, so its quite easy to create a user and set a password,

But what if you want to change the password for a user which was created earlier?
so issue the following command and set the new password

sudo passwd then enter, now you can see the system will ask you to enter the new password.

So the creation of user and changing the password is very simple,

Now as in windows, linux too has groups for each users. we will have a look how we can create modify a group in linux.

To create a group
sudo groupadd   

to delete a group
sudo groupdel   

now we will see how we can add a user which we have created just above to a group
so to add the user to a group
sudo adduser    

to delete user from a group
sudo deluser   remember the different between userdel and deluser, to delete user its userdel and to delete user form a  group its deluser

again as like the users , group details also saved as text file in the /etc/group location, with the help of vim or vi editor you can modify the groups and add users in this text file also. To add multiple users to a group just need to put comma (,) and add the user names on the right site that is all users added to group in text mode.

Now we will have a look on Permission, as you all know linux is more secure and really concern on its security on the files and directories so an administrator can change the security permission with the command call chmod.

basically linux has boolian number system to mention the permission
4- read
2-write
1-execute

so if a file has permission 777 means, in this three 7 each one of this for a special reason ,

the first digit is to specify the permission of this file owner , 2nd one to specify the permission of this file owner  group 3rd one is to mention the permission of every one else in this world,

So 7 means 4+2+1 which says the owner has permission to read , write and execute this file or directory,

the execute is a special case in linux where we may have some files to run like exe files in windows. so with out the execute permission we cannot run that file. So make sure if you have any files to execute you must give the permission.

consider a website you are running, so in that case you may need to do read and write work to htdocs directory.

so the user is you should have full permission , then give 7 to user, then the group of your user give 7 so every one in your group can have full permission, but what if you give full permission to everyone else? then ppl can do what ever they want and delete your files but remember some php files do need to execute so we ll give permission to read and execute and take the write permission out from others

so we will set the permission to 775 to a website directory. I hope you will get an idea about the permission now.

Alright so we have seen user, group, and permission but there is a big doubt while doing this all, what if i want to search a file in linux , how do i search?

linux has easy way to search files with different options,

sudo find -iname   , what is this iname means , its omit the case sensitive file name, So if you are not sure the file name has a capital or small letter dont worry just put -iname it will search and give you all the files such as Home,home,homE all are same in this case.

also if you are not sure the full file name you can use the * to search files with known characters such as wp-config.* this will display all the files with wp-config.

alright so we have come to a point where we got few idea about linux.

Now we will look the basic Networking stuffs in linux, this is very very basic only,

as in windows linux to has commands to see the ip address details but we have small change here , Windows use ipconfig but linux uses it as ifconfig.

and in windows we can release and renew the DHCP ip but then on linux how do you do that?

simple sudo dhclient this command will renew your IP from your DHCP server. remember we have to restart always if we do changes to a service so linux service for networking has to be restarted to active this changes , how do you restart the service?

sodu /etc/init.d/networking restart. this will restart the networking service , further you can use start, stop instead of  restart.

as i explained for users and group linux save the networking files details under the folowing location
using the vi editor we can open and see the configurations.

sudo vi /etc/networking/interfaces this is where we have the IP configuration details for linux.

if you want the linux machine to get IP from DHCP just modify the file as like this

iface eth0 inet DHCP 

if you want to assign IP manually then

iface eth0 inet static  then add the address details of your IP addres
Address
netmask
Network
Broadcast
gateway
DNS

So as we talk the DNS what is the file has the DNS details and resolve informations as like host file in windows
open the file sudo vi /etc/resolve.conf and change what ever the details you need to add,

if we talk DNS then we need to talk about the hostname as well so to see the hostname

sudo  /etc/hostname will display the hostname and to change this
sudo /etc/hostname

hope the details are use full and i ll keep posting more in future, on UFW firewall TAR and BACKUP.


Http vs Https