Tuesday 8 October 2013

How to add a Start Menu to Windows 8 Desktop

The Start menu from the desktop mode in Windows 8 is one of the most controversial talking points of the new windows 8 operating system. I’ve been using Windows 8 for the past few months on a non-touch laptop and have found there aren’t too many things I need to do in the desktop mode that can’t be achieved by pinning programs to the Task bar, or using Win + x shortcut 

The program I’ve been trying is Classic Shell. Click the link to download it. The version tested is 3.6.2. Following the wizard to install it. Once installed have a read of the readme file. You’ll now have a Classic Start menu


One thing to note, the Windows Key now opens the Classic Start menu, so if you want to get back to the Metro Start menu, hold shift and click the Classic Start menu button. Classic Shell also has the ability to boot the computer straight to the Desktop mode. Take a look at the Classic Shell Settings as these are both configurable settings along with many others.
Hope this will give you a real feel to use windows 8 and windows 7 desktop. Now take a big breath and work on your windows 7 , oh no Grrrr. Windows 8 system......

How to copy incoming or outgoing emails to another mailbox in Exchange 2010

Occasionally you may have a requirement to copy incoming or outgoing emails for specific users to another mailbox for monitoring or compliance purposes.
To be able to do this you can use an Exchange Transport Rule.
First open the Exchange Management Console, expand Organization Configuration, and select Hub Transport.
Right click the blank space in the main window and select New Transport Rule.
Select the conditions you want for the rule. Select from people as a condition, and then click the underlined value people to select from which people you want the rule to apply to. Click Add, and then add the email accounts you want to copy emails from. In our example we want to copy emails from the accounts mailbox. Click OK.


Click Next.
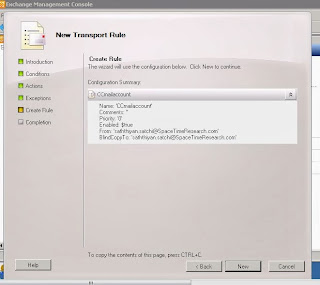
Now select the Action for the rule, in our scenario we are going to chooseBlind carbon copy (Bcc) the message to addresses, once selected, click the underlined addresses value. Click Add, select the user to Bcc the emails to, in our example we are going to Bcc the Administrator email account, clickOK, click Next.


If you want to add an exception to the rule you can do so next, in our example we want all emails to be copied so we won’t select an exception. Click Next.

Then on the Configuration Summary page click New to create the rule.

Done.....

Friday 27 September 2013

Extend Data Volume on a Windows Virtual Machine using VMware vCentre convertor

Already there is a method to do this task by extending the provisioned space but there we need to shutdown the server to add the hard disk,

This method doesn't need to shutdown the server to extend the virtual Drive.

Step 1:


Step 2:


Step 3:


Step 4:


Step 5:


Step 6: 


Step 7:


Step 8:


Step 9:


Thursday 26 September 2013

Extend Data Volume on a Windows Virtual Machine (VMware ESXi)


I had an issue recently with my disk space, I was running out of space so I need to add more space to the virtual Disk, 

But i was thinking if i add another new virtual disk and meagre that with the existing one i may need to shut down the server once. 

But luckily i had fee provisioned space so, I just increased the virtual disk space and then followed the steps given below,

Its worked well, but I couldn’t add the space without shutting down the server in this method.  
1.
Add Additional Space to the Virtual Hard Drive
- Once connected, select your Virtual Machine from the Hosts & Clusters or VMs & Templates view.
- Click "Edit Settings"
- Select your Virtual Disk, and increase the Provisioned Space.
- Click OK
- Using the vSphere Client, connect to vCenter server or your host. 
2.
Extend the Volume
- Open a Command Prompt
- Use the following commands from the Microsoft KB 325590
DISKPART>list volume
(You'll see the volumes - note the vol number you want to expand)
(Or whatever volume number you're expanding)
(will extend to full amount of space available)
- Access your Server (either Open Console from the vSphere Client or RDP) 
c:\diskpart.exe 
DISKPART>select volume 1 
DISKPART>extend 
DISKPART>exit


Friday 20 September 2013

Set up an FTP server on Amazon AWS EC2

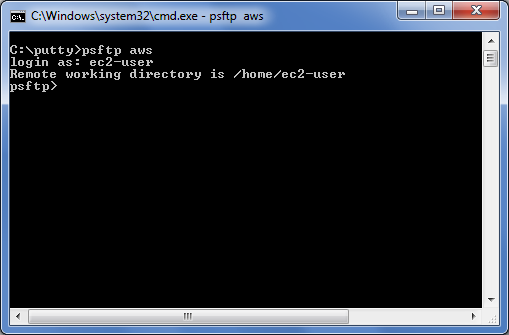
You really don't need to set up an FTP server if you simply want to tranfer files between your EC2 instance and your local machine. You can use PSFTP (coming with putty package) with a saved putty session for your EC2 conection. Open a command window, type in psftp your_saved_putty_session_name. Type ec2-user for  login as and you are connected.


If you don't like commandline tool, you can use Filezilla instead. Download and install Filezilla client.  Lauch Filezilla. Click Edit -> Settings and select SFTP under Connction. Click Add Keyfile to add the private key file you use for putty connection. Click OK.


Click File -> Site Manager, Click New Site, enter your AWS EC2's public DNS or IP in Host field. Choose SFTP, enter ec2-user in User field and click Connect.

Now you are connected to your EC2 instance with FileZilla.


If you still want to set up an FTP server on your AWS EC2. Below are steps to install VSFTP.
  1. login to  your AWS management console.
    • Go to EC2 and click the Security Groups link.
    • Then choose the default group and switch to the inbound tab (at the bottom of the page)
    • Add the port ranges as above (20-21 and 40000-41000) and apply the rule changes
  2. connect to your instance with putty.
  3. login as ec2-user
  4. sudo su
  5. yum vsftpd
  6. change the conf file. vim /etc/vsftpd/vsftpd.conf. Add
    write_enable=YES 
    pasv_max_port=41000
    pasv_min_port=40000
    port_enable=YES
    pasv_enable=YES
  7. Add an FTP user (see instruction here)
  8. Start the FTP server. service vsftpd start

How to enable direct ssh to EC2 linux instance without keypair file

how to enable direct ssh to EC2 linux instance without keypair file
To enable the direct ssh to linux EC2 instance without using keypair file we have to edit the sshd_config file.
Follow the given below steps
Step 1 : Login into linux EC2 instance with the help of keypair. Use the user name which is related to your instance. for eg.
example:
ssh -i keypar_file.pem ubuntu@ec2-1.1.1.1.compute-1.amazonaws.com
Step 2: After login ,edit the /etc/ssh/sshd_config file and make the value of parameter called PasswordAuthentication as yes
vi /etc/ssh/sshd_config
change the PasswordAuthentication value as yes
PasswordAuthentication yes
:wq
save and exit
Step 3: Restart the ssh service.
In Debian or Ubuntu instance:
/etc/init.d/ssh restart
In CentOS or Red Hat instance:
/etc/init.d/sshd restart
Step 4: Open new terminal in your PC or laptop. ( Do not take the risk :) ,playing safe side )
Now try direct ssh without using keypair file.
for eg.
ssh ubuntu@ec2-1.1.1.1.compute-1.amazonaws.com

Wednesday 18 September 2013

DNS Pointing

A (Host) records

A records (also known as host records or address records) point a domain name or subdomain to an IP address. For example, if you want your domain "domainnamegoeshere.com" to point to your home computer (whose IP address is, for example, 172.0.0.1), the A record would list "domainnamegoeshere.com", or "@" as the host and "172.0.0.1" as the "Points To" IP address. Entering "@" for the host name is the same as entering your domain name, minus the "www". Entering "www" for the host name is the same as entering your domain name, including the "www


CNAME records
CNAME records (also known as alias records) point a subdomain to an existing A (host) record so that the domain points to the appropriate IP address.
Entering "@" for the host name is the same as entering your domain name, including the "www".
The Points To Host Name should be defined as your domain name (i.e., "www.domainnamegoeshere.com") or "@" (Entering "@" will automatically insert your domain name as the host name for the CNAME Record). The Alias field should be the subdomain of your top-level domain the CNAME record points to your domain.
For example: If you want the CNAME record to point "www" within your domain to "www.domainnamegoeshere," you should enter "www" in the Alias field and "www.domainnamegoeshere.com" in the Points To field. If you want the CNAME record to point "email" within your domain to "email.domainnamegoeshere," enter "email" as the Alias and "email.domainnamegoeshere.com" as the Points To Host Name.
MX records
MX records are for routing email that is addressed to a particular domain name. Like a CNAME record, an MX record points one domain name or subdomain to another domain name or subdomain for which an A record exists.
Entering "@" for the host name is the same as entering your domain name, minus the "www." Entering "www" for the host name is the same as entering your domain name, including the "www".


NS records
NS records specify the authoritative nameservers (both primary and secondary) for the given domain. The authoritative nameservers are identified by name, not IP address. For this reason, an A record must exist for the specified nameservers. Without it, connecting to the servers might be impossible. In every DNS zone, there must be at least two NS records.

Http vs Https