Friday, 24 September 2021
Monday, 20 September 2021
Wednesday, 15 September 2021
Configure common wallpaper using GPO
Subscribe to " FACEITNET " Youtube channel for more interesting videos
Group Policies are the easiest method
administrators can use to configure computer and user settings on their
networks using Active Directory Domain Services (AD DS). As long as computers
are joined to your domain and your users log in with domain credentials, you
can set Group Policies that will reduce help desk tickets and costs, and
control all configurations. All the while keeping your user base happy and secure.
Configure common wallpaper using
GPO
As you would have seen
in many large enterprises, every computer in the organization will have same
wallpaper. How did they configure all the computers with common wallpaper? Have
they manually configured this on each and every computer? The answer is no.
Then how did they configure it?
The simple answer is GPO. Yes using GPO we can easily assign a common wallpaper to each and every computers in the domain. Let’s see how to configure a common wallpaper using GPO.
To configure a common wallpaper you must have a picture and that should be in a shared folder with read and write permission to every users.
1. Create a folder and share it first.

2. Now assign the full permission to
everyone

3. Go to Group policy manager in your domain controller.

4. Create a new group Policy by right clicking on the Group Policy Object.

5. Right click on the newly created
Group policy and go to edit expand User Configuration, expand Administrative
Templates, expand Desktop, and then click Desktop. In the details pane,
double-click Desktop Wallpaper.

6. Now enable the policy and give the wallpaper name with the full shared path. Confirm the path by accessing via run. Then apply and ok on the wallpaper GPO screen.


7. Now you need to apply the newly created policy to a specific OU or if it’s for all the users then apply under the domain. To apply the policy under the domain simply click on the policy and drag it where ever you would like to apply and drop it there, the new policy is now lined to that specific OU.

8. On the client machine wait for the
policy to get updated. The users may have to log off and login once to see the
changed desktop wallpaper. If not then you can use gpupdate /force command in
the cmd as well.
9. You can verify if the policy is been applied or not by entering gpresult /r in command prompt.


Most common and important other GPOs .
1. Disable Windows Update using Group
Policy
2. Disable File Download in Internet
Explorer using Group Policy
3. Block USB or Removable Devices using
Group Policy
4. Prevent Windows from Storing LAN
Manager Hash
5. Control Access to Command Prompt
6. Disable Forced System Restarts
7. Disallow Removable Media Drives, DVDs,
CDs, and Floppy Drives
8. Restrict Software Installations
9. Disable Guest Account
10. Set Minimum Password Length to
Higher Limits
11. Set Maximum Password Age to Lower
Limits
12. Restrict Access to Control Panel and
Settings
13. Install application using GPO
14. Automatic drive mapping.
15. Folder Redirection.
Monday, 13 September 2021
Sunday, 12 September 2021
Friday, 10 September 2021
Thursday, 9 September 2021
Most Frequently Used UNIX / Linux Commands
Ubuntu one of the most popular operating systems with an extensive user-base around the world, Below, you will find the 40 best Ubuntu terminal commands our experts have handpicked in an aim to skyrocket your Ubuntu system experience

ls : presents to you the contents of a particular directory – both files and directories

vim :Vim is a text editor. The most simple commands allow you to open and close documents as well as saving them
Install Vim on Ubuntu/Debian:
If you're using Ubuntu or Debian use apt-get to install Vim:
sudo apt-get install vimInstall Vim on CentOS/Fedora:
If you're using CentOS or Fedora, use yum to install Vim:
sudo yum install vimpwd Print working directory command in Linux
 |

ifconfig : The ifconfig command will give you the list of all the network interfaces along with the IP addresses, MAC addresses and other information about the interface.
if the tool ifconfig is not installed then you can install using the below commons

ifconfig
 |
sudo: Super User ( sudo apt-get update ) | Command to escalate privileges in Linux

less – The less command is used when the output printed by any command is larger than the screen space and needs scrolling. The less command allows use to break down the output and scroll through it with the use of the enter or space keys.
wget – Direct download files from the internet, wget command is one of the handiest command-line utilities available

cd – Linux command to navigate through directories

tar – Command to extract and compress files in Linux
To compress

To uncompress

grep (global regular expression print.) – Search for a string within an output
grep 'two' /~Download/sample1.doc

ps – Display active process

ssh – Secure Shell command in Linux

df – Display disk filesystem information

rm – Delete files or directories

mv – Move or rename files in Linux

cp – Similar usage as mv but for copying files in Linux

cat – Display file contents on the terminal

clear – Clear the terminal display


chmod – Command to change file permissions

wget – Direct download files from the internet
passwd – Create or update passwords for existing users
Wednesday, 8 September 2021
Saturday, 4 September 2021
How to redirect your old website to new URL ( URL /Website Redirection)
Here is the step by step guide
How to redirect the website to a new domain name? (URL Redirection/Web Redirection)
Let’s say you wish to switch to a new domain because it represents your new business better. Now that i have already got a well established website, I want to redirect all the traffic to my new business URL. You need to know how to redirect your domain properly. In this, we’ll learn what a URL redirect is, how to forward your URL?

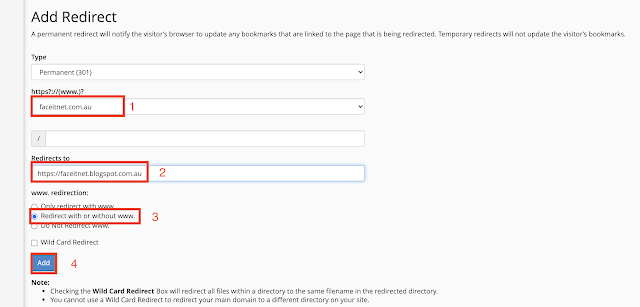
7) Enter the redirection details and click add. You will see something like this in your account.

What is a URL Redirect?
URL Redirection means when you type a website address on the browser that should automatically changed to another address and redirect your http request to the new address.
Four most common redirect types:
- 301 redirect is a permanent redirect that shows the new URL and carries over Google PageRank.
- 302 redirects are temporary and display the new URL.
- URL frames are redirects that display a frame from the website you’re redirecting to.
- Meta refresh is a redirect that happens in the browser. It shows a specific message and a countdown timer before redirecting to a different page.
Let's see the steps now.
Here is the link to watch https://youtu.be/dKhPGyxZ8fo
I have a blogspot and the URL is faceitnet.blogspot.com and i have a domain name called faceitnet.com.au
My blogspot is already well established and got huge traffic so rather i redesign and build a new website i decided to register the domain name and going to redirect all the traffic to my blogspot site. so to do that first
1) Register the domain name. - You can do it via godaddy.com , crazy.com.au
2) Register a hosting server -You can do it via godaddy.com , crazy.com.au )
3) Go to Your domain registry and update the @ and WWW record to your hosting server IP address.
4) Once the domain name and Hosting is registered go to your hosting cPanel
5) Under the cPanel go to Domains

6) Click Redirect

7) Enter the redirection details and click add. You will see something like this in your account.

8) Now go to new domain name faceitnet.com.au it should automatically redirect your request to faceitnet.blogspot.com
Friday, 3 September 2021
Self-Signed SSL certificate on exchange server 2019
A Self signed certificate is prepared for limited access environment like to access webmail and also useful for a test environment.
Create Exchange Server 2019 SSL Certificate Request
Wednesday, 1 September 2021
TOP 20 UNTIMATE WINDOWS CMD COMMANDS
Subscribe to " FACEITNET " Youtube channel for more interesting videos
The Microsoft Windows command prompt is a great feature and core the Windows operating system. There are some CMD commands that are very useful and easy to use by standard users see the Windows information.
Lets see few of the commands
1) Ping :
Verifies IP-level connectivity to another TCP/IP computer by sending Internet Control Message Protocol (ICMP) echo Request messages. The receipt of corresponding echo Reply messages are displayed, along with round-trip times.
 |
| ping with successful response |
 |
| ping /a 192.168.20.11 |
2) TRACERT: Trace Route
This diagnostic tool determines the path taken to a destination by sending Internet Control Message Protocol (ICMP) echo Request or ICMPv6 messages to the destination with incrementally increasing time to live (TTL) field values. Each router along the path is required to decrement the TTL in an IP packet by at least 1 before forwarding it.
 |
| Tracert google.com |
 |
| Prevent the resolution of each IP address to its name |
3) tskill:
Ends a process running in a session on a Remote Desktop Session Host server.

4) ipconfig /all:
Displays all current TCP/IP network configuration values and refreshes Dynamic Host Configuration Protocol (DHCP) and Domain Name System (DNS) settings.

5) gpupdate :
Updates Group Policy settings.
gpupdate /force
gpupdate /force
gpresult /R

6) ipconfig /flushdns
To flush the DNS resolver cache when troubleshooting DNS name resolution problems, type.

7) nslookup:
Displays information that you can use to diagnose Domain Name System (DNS) infrastructure.

8) FC:
Compares two files or sets of files and displays the differences between them.

9) NETSTAT: Network Statistics
Displays active TCP connections, ports on which the computer is listening, Ethernet statistics, the IP routing table, IPv4 statistics (for the IP, ICMP, TCP, and UDP protocols), and IPv6 statistics (for the IPv6, ICMPv6, TCP over IPv6, and UDP over IPv6 protocols).


10) SHUTDOWN: Turn Off Computer
11) SYSTEMINFO: System Information
Displays detailed configuration information about a computer and its operating system, including operating system configuration, security information, product ID, and hardware properties (such as RAM, disk space, and network cards).

12) Taskkill
Ends one or more tasks or processes. Processes can be ended by process ID or image name.
13) Chkdsk
14) cls
15) Hostname
Displays the host name portion of the full computer name of the computer.

16) getmac
Returns the media access control (MAC) address and list of network protocols associated with each address for all network cards in each computer, either locally or across a network.

17) arp:
Displays and modifies entries in the Address Resolution Protocol (ARP) cache. The ARP cache contains one or more tables that are used to store IP addresses and their resolved Ethernet or Token Ring physical addresses
To display the arp cache table for the interface that is assigned the IP address 192.168.20.15,

arp /a
18) Mkdir
19) quser:
Displays information about user sessions on a Remote Desktop Session Host server.

20) net user
Adds or modifies user accounts, or displays user account information
Net User is a command line tool that allows system administrators to manage user accounts on Windows PCs

net user Saththiyan

The following example adds a user account for a user whose full name is Sathi Satchi and whose user account name isSathi, with logon rights from 8 A.M. to 5 P.M., Monday through Friday (no spaces in time designations), a mandatory password (Cyk4^g3B), and the user's full name

Subscribe to:
Comments (Atom)
-
<!DOCTYPE html> <html> <head> <meta name="viewport" content="width=device-width, initial-scale=1"...
-
Subscribe to " FACEITNET " Youtube channel for more interesting videos FaceITNet Youtube Channel IDS using SNORT Install...
-
 Subscribe to " FACEITNET " Youtube channel for more interesting videos FaceITNet Youtube Channel Most of us have used Cisco Pa...