Citrix Hypervisor 8.2 Installation
on VMwaer Workstation Pro
This
section contains procedures to guide you through the installation,
configuration, and initial operation of Citrix Hypervisor.
Citrix
Hypervisor installs directly on bare-metal hardware avoiding the complexity,
overhead, and performance bottlenecks of an underlying operating system. It
uses the device drivers available from the Linux kernel. As a result, Citrix
Hypervisor can run on a wide variety of hardware and storage devices. However,
ensure that you use certified device driver
Use
the Citrix Hypervisor 8.2 Base Installation ISO file. You can
download this file from the Citrix download
site


Install the Citrix Hypervisor server
Mount
Citrix Hypervisor server ISO file to a CD and power on the
virtual machine

Following
the initial boot messages and the Welcome to Citrix Hypervisor screen, select
your key map (keyboard layout) for the installation.

The
Welcome to Citrix Hypervisor Setup screen is displayed.

The
Citrix Hypervisor EULA is displayed. Use the Page Up and Page Down keys to
scroll through and read the agreement. Select Accept EULA to proceed

Select the appropriate action. You might see any of
the following options:
·
Perform
clean installation


·
Upgrade:
If the installer detects a previously installed version of Citrix Hypervisor or
XenServer, it offers the option to upgrade. For information about upgrading
your Citrix Hypervisor server, see Upgrading
from an existing version.
·
Restore:
If the installer detects a previously created backup installation, it offers
the option to restore Citrix Hypervisor from the backup.
If
you have multiple local hard disks, choose a Primary Disk for the installation.
Select OK.

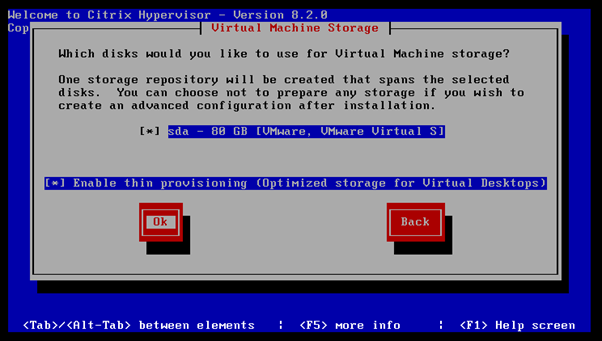
Choose
which disks you want to use for virtual machine storage. Information about a
specific disk can be viewed by pressing F5.
Select
your installation media source. To install from a USB or CD, choose Local media

Choose Automatic configuration (DHCP) to configure
the NIC using DHCP, or Static configuration to configure the NIC manually. If
you choose Static configuration, enter details as appropriate.

Indicate
if you want to verify the integrity of the installation media. If you select Verify installation source

Set
and confirm a root password, which XenCenter uses to connect to the Citrix
Hypervisor server. You also use this password (with user name “root”) to log
into xsconsole, the system configuration console

Specify the hostname and the DNS
configuration, manually or automatically via DHCP.

In the Hostname Configuration section,
select Automatically set via DHCP to have the DHCP server
provide the hostname along with the IP address. If you select Manually
specify, enter the hostname for the server in the field provided.
Select
your time zone by geographical area and city.

Specify
how you want the server to determine local time


Select Install Citrix Hypervisor


The
next screen asks if you want to install any supplemental packs. If you plan to
install any supplemental packs provided by your hardware supplier, choose Yes otherwise NO

From
the Installation Complete screen, eject the installation media (if installing
from USB or CD) and select OK to reboot the
server.


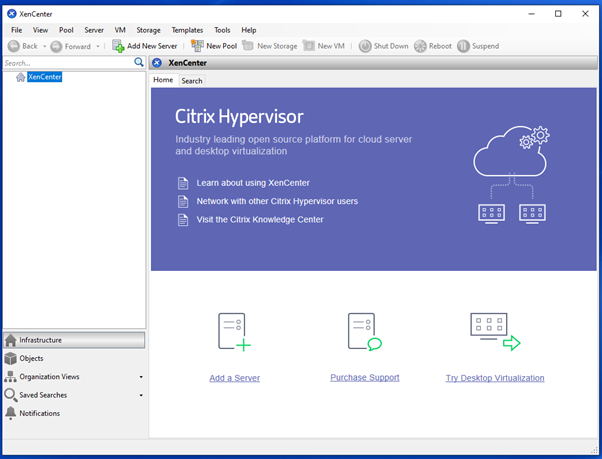
Install XenCenter
XenCenter must be installed on a Windows machine that
can connect to the Citrix Hypervisor server through your network. Ensure that
.NET framework version 4.6 or above is installed on this system.
To install XenCenter:
1.
Download the installer for the latest version of
XenCenter from the Citrix Hypervisor Download page.
2.
Launch the installer .msi file.


3.
Follow the Setup wizard, which allows you to modify
the default destination folder and then to install XenCenter

Connect XenCenter to the Citrix
Hypervisor server
To connect XenCenter
to the Citrix Hypervisor server:
1.
Launch XenCenter. The program opens to the Home tab.
2.
Click the Add New Server icon.
3.
Enter the IP address of the Citrix Hypervisor server
in the Server field. Type the root user name and
password that you set during Citrix Hypervisor installation. Click Add.
4.

5.
The first time you add a host, the Save and
Restore Connection State dialog box appears.


No comments:
Post a Comment