Wednesday 9 June 2021

Network Drive Mapping using GPO and Bat files

Its very common practise in large organisations to map the shared folders using GPO. It can save time for the administrator to go to each computer and map them one by one. 


Lets see how we can do the mapping here.. 

You need a domain controller and a client computer connected to domain ( member) 

In my case i have created two OUs and each OUs has two users. I am going to create mapping to all the users. To do this..

1) need to have shared folders

2) Need a Bat file and save under  sysvol folder 

 C:\Windows\SYSVOL\sysvol\YOUR_DOMAIN_NAME\Script

3) need a GPO

Save the 

Step 1) sharing a folder : 

Create a new folder ,--> Right Click --> Property --> sharing on the top 2nd tab. 

Add who needs to be given permission to read and write in this folder.. remove others except Administrator. 


Step 2) Need a Bat file.

Open the Notepad and save it as .bat ( make sure no .txt is attached with the file extension) 

if you are not sure how to save as .bat file ( read here )

@echo off
net use S: \Delete
net use S: \\server\data
net use P: \\server\Print

You can add as many as shared folders with the command net use S: \\server\data,  make sure to change the drive letter and File path. 

save this file under 

 C:\Windows\SYSVOL\sysvol\YOUR_DOMAIN_NAME\Script


Go to your Group policy manager and create a new policy under the specific OU in group policy manager and edit that. 


Option 2: 


Under user configuration --> Preference --> Windows Setting --> Drive maps --> right click --> new --> mapped Drive. 

Specify the location \\servername\path.

select a Drive Letter to show when mapped. 


Thanks all you login to client PC and you should be able to see the map Drive. 

Change file extension ( .txt to .bat)

If you are wondering how to change a file extension follow these steps. 


First make sure you have the Hide file extension is deselected. 


One is deselected you can see the file extension 


Right click on the new text document.txt and rename. when you rename make sure to remove .txt and change it to .bat


Click yes. thats all the file is change to .bat extension now. 

Wednesday 5 May 2021

Change the drive letter in the Windows 10 command prompt

  1. Open the command prompt with administrator permission ( Run as Administrator) 
  2. Type diskpart 
  3. Type List Volume to see full list with drives and partitions.


        4.    
Look at the ### column above. 
        5.    You need to use its value with the command select volume 2
        6.    Substitute the NUMBER portion with the actual partition number you would like to change


    7.    Type the command remove letter=D o remove the drive letter. Substitute the X portion with the appropriate letter


        8.    Not that its removed 


        9.    Should you wish to assign again use the command below  Assign letter=G


Saturday 24 October 2020

Youtube Error On Safari Browser : An error occurred. Please try again later. (Playback ID:XXXXXXX) Learn More

 An error occurred. Please try again later. (Playback ID:XXXXXXX)  Learn More


I have noticed that every time when I go to youtube to play some video I kept on getting the following message on Youtube.

I tried to disable the AdBlockers and all the non-default extensions still it didn't work. 

Tried on Chrome/Opera Youtube seems doesn't have any issues. 

So it was something to do with Safari and did some search on google and found this solution it the magic helped me to fix it 

Go to Develop ExpExperimental features -> enable VP9 SW decoder on battery


Thursday 15 October 2020

Set up an L2TP/IPsec VPN on a Windows Server 2016


Set up an L2TP/IPsec VPN on a Windows Server 2016


Login to server and Click on Check Updates 


Open Windows Start menu and click on Server Manager


Click on Manage -> Add Roles and Features


Select Role-based or feature-based installation and click on Next


Select a server from the server pool and click on Next

`


Select Remote Access and click on Next


Click on Next


Select DirectAccess and VPN (RAS) and Routing


Click Next


Select Restart the destination server automatically if required , Click Yes


Open Routing and Remote Access in Server Manager -> Tools -> Routing and Remote Access


Right click on the server name and click on Configure Routing and Remote Access


Select Custom configuration and click on Next


Select VPN access and NAT and click on Next


Complete the wizard by clicking on Finish and start  service 


Configure Routing and Remote Access


Right click on the server name (VPN) and click on Properties


Navigate to Security tab and select Allow custom IPsec policy for L2TP/IKev2 connection


fill this with a strong password. Eg Tafe123$ (remember this password we will use this later in the configuration) 


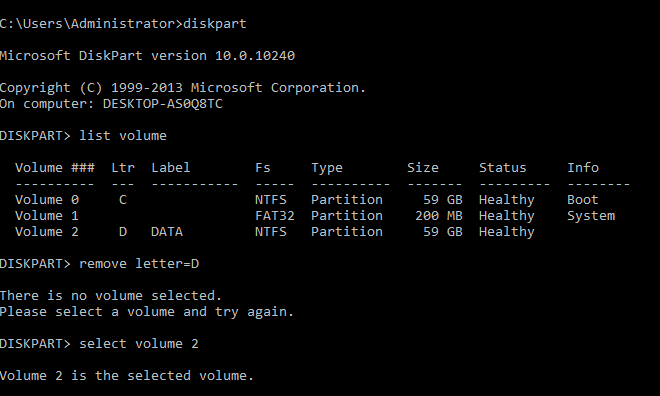
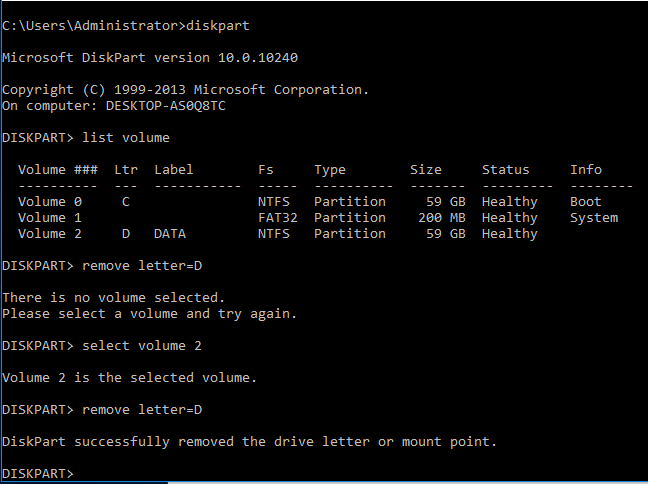
Navigate to IPv4. In our setup we do not have a DHCP server, therefore, we have to select the option Static address pool and click on Addto enter your IP address range.


Configure NAT

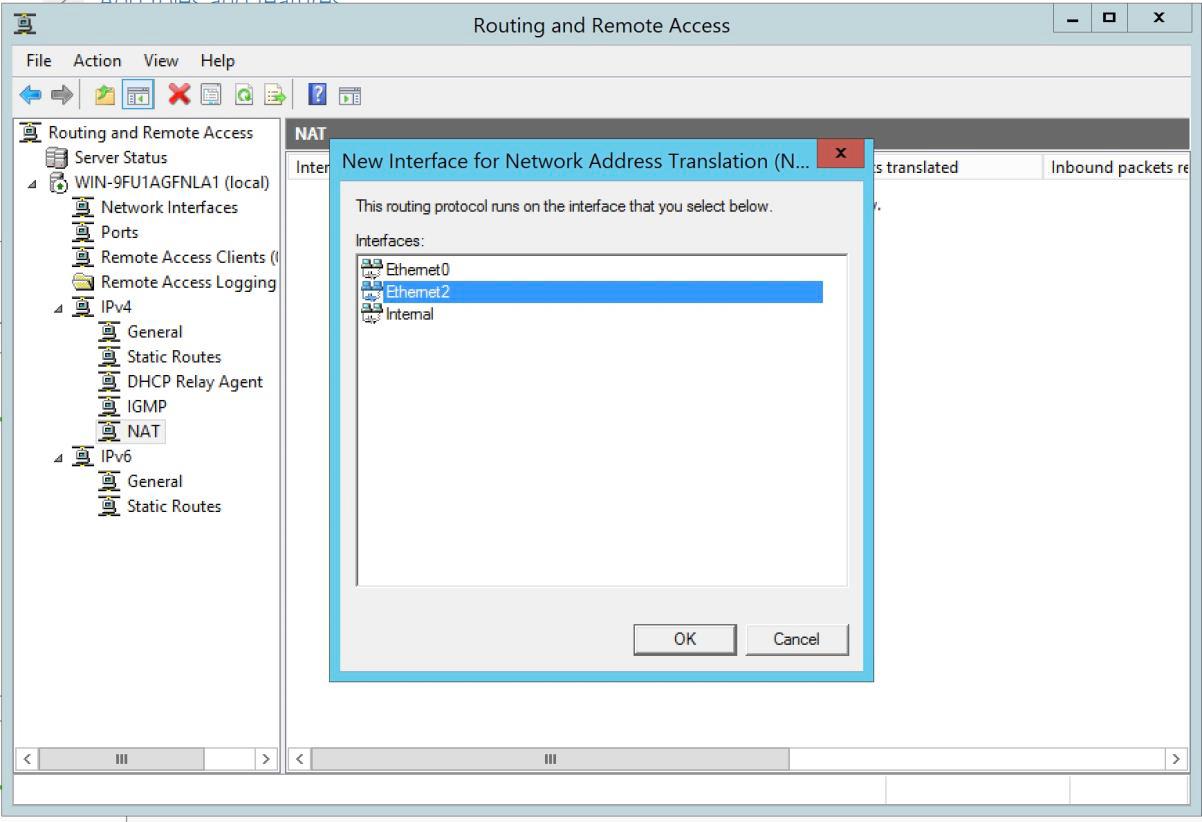
Right click on NAT by navigating to Routing and Remote Access -> VPN (server name) -> IPv4 -> NAT and click on New Interface...


A new screen will be opened and select Ethernet and click on OK.


Select Public interface connected to the Internet and select Enable NAT on this Interface


Open Services and Ports tab select VPN Gateway (L2TP/IPsec - running on this server) from the list


A new screen will be opened. Edit Private address variable from 0.0.0.0 to 127.0.0.1 and click on OK


Restart Routing and Remote Access

Right click on server name (VPN) and navigate to All Tasks and click on Restart


Windows Firewall


A new screen will be opened. Select Predefined: Routing and Remote Access and click on Next


Select Routing and Remote Access (L2TP-In) and click on


Configure User(s)

Before user(s) can start using VPN we have to give them permission to connect.


You should see a list of users of your server. Right click on the user you want to enable VPN and click on Properties


A new screen will be opened with User Properties. In our example it’s Administrator. Open Dial-Intab and select Allow access


Navigate to Tools -> Remote Access Management. A new screen will be opened with the Remote Access Dashboard. You can see in our overview that services are running without warnings.


Log in to Windows 10

Configure VPN

Click on Set up a new connection on a network


Select Connect to a workplace and click on


Click Use my Internet connection (VPN)


Enter your IP address in the Internet Address field. 192.168.32.10 ( ignore the one in the picture) 


Text Box: 192.168.32.10


After you have clicked on Create the set up wizard will be closed.


Click Change adapter settings on the left side menu.


You will now see all available interfaces. Open Properties of the VPN connection interface


Open dropdown of Type of VPN and select Layer 2 Tunneling Protocol with IPsec (L2TP/IPsec)


Click on Advanced settings. Select Use preshared key for authentication and fill in the preshared key which you created on the Windows Server. Apply it by clicking on OK.


Return back to the Security tab. Select Allow these protocols and check the following values


Connect to VPN server

You will be asked to enter a User name and Password


Finished


Http vs Https